How to restrict API access with Static Access Token
Kuroco's API security
You have following 5 options for Kuroco's API security:
- None
- Static Access Token
- Dynamic Access Token
- Cookie
- Privileged Static Token
You can set "None" if you want to create and test a temporary development API, or if you want to use completely open data.
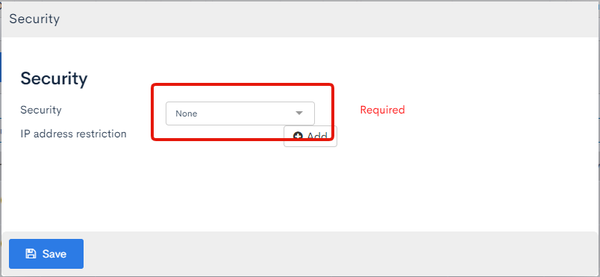
However, if you set the API security setting to "None", anyone can use the API, and it will be possible to accept API requests indiscriminately from the outside.
If this situation is not as expected, you can use the Static Access Token function to impose some restrictions. This tutorial explains how to apply access restrictions using Static Access Token.
Note:
The character string of StaticToken becomes information that can be viewed from the outside by referring to the network communication of the public site and the description in the JS file. Therefore, if you want to restrict secure information, please do so by restricting login authentication by Dynamic Token / Cookie restriction instead of Static Access Token or by restricting API by browsing group.
How to restrict API access by Static Access Token
This section explains how to restrict API access by Static Access Token.
1. Configure the security of Kuroco API
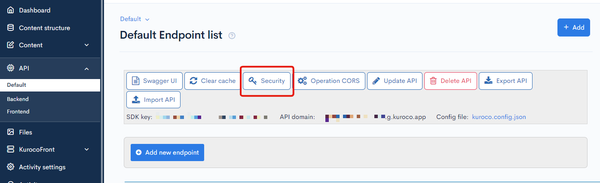
On any API list page, click [Security].
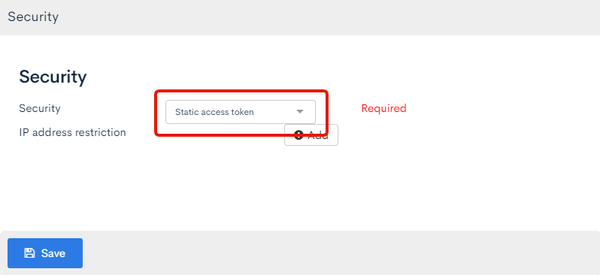
Change the "Security" to Static Access Token and click [Save]
2. Issue Static Access Token
Click [Swagger UI] on the API list page.
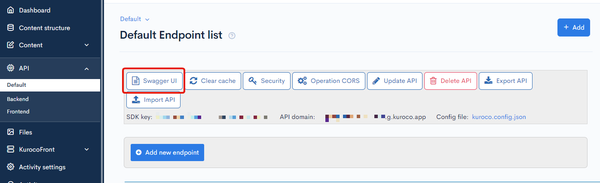
Enter "Valid Until" of "Generate Static Access Token" at the top of Swagger UI page and click [Generate].
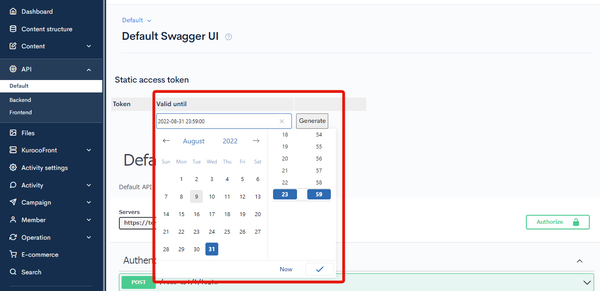
Token will be issued. You will need it later so save it.
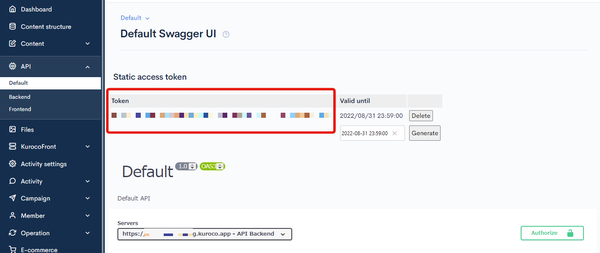
The configuration on the Kuroco management page is now complete.
3. API Access Configuration
As an example, here are code snippets for Nuxt 3 and Next.js.
In this tutorial, the following versions are used:
- Nuxt3: v3.14.0
- Next.js: v15.0.3 (Using App Router)
First, install the necessary packages for the tutorial:
- Nuxt3
- Next.js
No additional packages are required for Nuxt 3.
npm install axios
4. Setting Environment Variables
- Nuxt3
- Next.js
NUXT_STATIC_TOKEN=YOUR_STATIC_TOKEN_HERE
NUXT_PUBLIC_API_BASE_URL=https://your-api-endpoint.com
STATIC_TOKEN=YOUR_STATIC_TOKEN_HERE
NEXT_PUBLIC_API_URL=https://your-api-endpoint.com
Environment variables prefixed with NUXT_PUBLIC_/NEXT_PUBLIC_ are accessible on the client side. For more details, refer to the following links:
5. Updating Configuration Files
- Nuxt3
- Next.js
export default defineNuxtConfig({
  runtimeConfig: {
    public: {
      staticToken: process.env.NUXT_STATIC_TOKEN,
      publicApiBaseUrl: process.env.NUXT_PUBLIC_API_BASE_URL
    }
  }
})
/** @type {import('next').NextConfig} */
const nextConfig = {
  env: {
    STATIC_TOKEN: process.env.STATIC_TOKEN
  }
}

module.exports = nextConfig
6. Setting Static Access Token in API Request Headers
- Nuxt3
- Next.js
export default defineNuxtPlugin(() => {
  const config = useRuntimeConfig()

  return {
    provide: {
      customFetch: (url: string, options = {}) => {
        return useFetch(url, {
          baseURL: config.public.apiBase as string,
          headers: {
            'x-rcms-api-access-token': config.public.staticToken as string
          },
          ...options
        })
      }
    }
  }
})
The Kuroco Beginner's Guide does not cover the use of plugins, but this is a good opportunity to explore it in the official documentation:
import axios from 'axios'

export const api = axios.create({
  baseURL: process.env.NEXT_PUBLIC_API_URL,
  headers: {
    'x-rcms-api-access-token': process.env.STATIC_TOKEN
  }
})
7. API Usage Examples
- Nuxt3
- Next.js
<script setup>
// Basic usage
const { $customFetch } = useNuxtApp()
const { data: response } = await $customFetch('/api/endpoint');

// Example of overriding headers
const { $customFetch } = useNuxtApp()
const { data: customData } = await $customFetch('/api/endpoint', {
  headers: {
    'x-rcms-api-access-token': 'different-token'
  }
}
</script>
<template>
  <div>
    <div v-if="pending">Loading...</div>
    <div v-else>
      <pre>{{ data }}</pre>
    </div>
  </div>
</template>
// Using API client
import { api } from '@/lib/axios'

export default function Page() {
  const [data, setData] = useState(null)

  useEffect(() => {
    const fetchData = async () => {
      const response = await api.get('/api/endpoint')
      setData(response.data)
    }
    fetchData()
  }, [])

  return <div>{/* Display data */}</div>
}

// Using built-in fetch
async function getData() {
  const res = await fetch('https://api-endpoint.com/api/endpoint', {
    headers: {
      'x-rcms-api-access-token': process.env.STATIC_TOKEN
    }
  })
  return res.json()
}

// Using in App Router Server Component
export default async function Page() {
  const data = await getData()
  return <div>{/* Display data */}</div>
}
- Nuxt 3: Examples of using
useFetch/$fetchto automatically include the static token in headers. - Next.js: Examples of using
fetchoraxiosto set static tokens in request headers.
- Set the static access token as a key in the request header
X-RCMS-API-ACCESS-TOKENto send requests and retrieve data.
- Depending on your project, it is recommended to write environment variables in separate files such as
.envor.env.localetc... Make sure to add environment variable files to.gitignoreto prevent committing sensitive information to the repository.
The configuration of API access restriction by Static Access Token is now complete.
How to restrict API access by Privileged Static Token
The privileged static token uses the same token-based authentication as the static access token, but requires specifying a member during token generation.
Since requests are executed with the permissions of the specified member, you can access endpoints that have API request restrictions without going through the login or dynamic token generation flow.
This is useful, for example, in server-to-server communication where you need to access the API with the permissions of a specific member.
Setting the token in the request header and using it from the frontend are the same as for the static access token. This section explains the management screen operations that differ from the static access token.
1. Set the security to Privileged Static Token
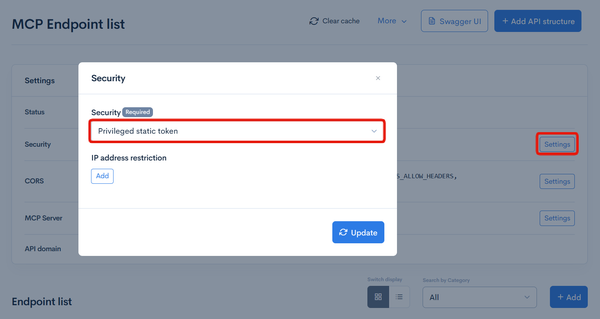
On the API page, click the Security [Settings], change the "Security" to [Privileged Static Token], and click [Update].
2. Issue the Privileged Static Token
Click [Generate] of [Privileged Static Token] on the API information page, and specify the following items in the displayed dialog:
- Expiration date: Specify the expiration date of the token.
- Memo: You can enter an optional memo.
- Member ID: Specify the ID of the member to associate with the token. API requests will be executed with the permissions of this member.
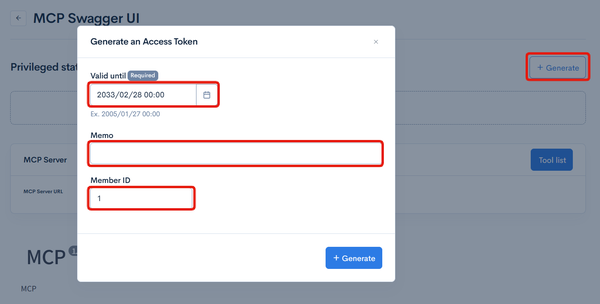
After entering the values, click [Generate]. The token will be issued. You will need it later, so save it.
3. API Access Configuration
Setting the privileged static token in the request header is the same as for the static access token.
You can reuse the code in "3. API Access Configuration" through "7. API Usage Examples" above by simply replacing the token value set in the environment variables with the privileged static token value.
As with the static access token, set the token in the request header using X-RCMS-API-ACCESS-TOKEN as the key.
The privileged static token executes requests with the permissions of the specified member. Therefore, generate the token by specifying a member with appropriate permissions.
Also, as with the static access token, there is a risk that the token string may leak, so design your system assuming that tokens will be rotated, and make sure not to commit sensitive information to the repository.
The configuration of API access restriction by Privileged Static Token is now complete.
Reference
Related documents
Support
If you have any other questions, please contact us or check out Our Slack Community.