Steps to Create a Development Environment Site
Overview
Once you have your custom domain, you can use the default domain https://SITE-KEY.g.kuroco-front.app for your staging site. This tutorial explains how to do so by creating a separate GitHub branch.
We will also create a sub-site for Kuroco and set up a development environment where the backend and frontend differ from the production environment.
What you'll learn
To make https://SITE-KEY.g.kuroco-front.app a stage site, perform the following steps.
Before you start
We will implement the following branch and domain structure.
| Environment | Branch | Domain | Purpose |
|---|---|---|---|
| Production | main | Custom Domain | Public-facing site |
| Staging | stg | https://SITE-KEY.g.kuroco-front.app | Site for pre-checks of design modifications, separate from backend |
| Development | dev | Custom Domain | Site for pre-checks of added functionality, separate from backend and frontend |
Note: While this tutorial uses the branch names stg and dev, you may change them as desired.
Furthermore, this tutorial assumes that the procedures for Using your own custom domain name on KurocoFront and Using your own API domain with KurocoFront have been completed and that your site can be displayed with a custom domain.
Implementing a staging site
1. Create a branch for the staging site on GitHub
First, separate the production site and staging site displays in the GitHub branch. Go to your directory and execute the following command:
git checkout -b stg
2. Creating Environment Variable Configuration Files
When using different environment variables for the development and production environments, such as site titles and meta information, we create and manage configuration files for each environment.
Here, we will create the following files for the production and staging environments.
In the staging environment, the backend shares the same API domain as the production environment. However, since the development environment we will create later will have a different domain, we will configure it accordingly.
Please replace the part that says YOUR_SITE_KEY with your own site key.
env.production.js
module.exports = {
  API_BASE: 'https://YOUR_SITE_KEY.g.kuroco.app',
  SITE_TITLE: 'Kuroco Sample Site',
  META_TITLE: 'Kuroco Sample Site',
  SITE_DESCRIPTION: 'A sample site created with reference to the Kuroco Beginner\'s Guide.',
  RSS_SITE_TITLE: 'Kuroco Sample',
  RSS_SITE_DESCRIPTION: 'Start using Kuroco with the Kuroco Beginner\'s Guide',
  ROBOTS: 'index',
}
env.staging.js
module.exports = {
  API_BASE: 'https://YOUR_SITE_KEY.g.kuroco.app',
  SITE_TITLE: '[STG]|Kuroco Sample Site',
  META_TITLE: '[STG]|Kuroco Sample Site',
  SITE_DESCRIPTION: '[STG]|A sample site created with reference to the Kuroco Beginner\'s Guide.',
  RSS_SITE_TITLE: '[STG]|Kuroco Sample',
  RSS_SITE_DESCRIPTION: '[STG]|Start using Kuroco with the Kuroco Beginner\'s Guide',
  ROBOTS: 'noindex',
}
The environment variable configuration files added here can be accessed externally if the GitHub repository is public. Do not set sensitive information such as API keys in environment variables. Instead, store them in GitHub Secrets and configure them to be called in the YAML file.
3. Create kuroco_front.json for stage site
Create kuroco_front.json for the stage site in order to apply BASIC authentication to the stage site only.
Copy kuroco_front.json under /public directory and create kuroco_front_stg.json.
Describe Basic authentication as follows.
{
    "rewrites": [
        {
          "source": ".*",
          "destination": "/index.html"
        }
      ],
    "redirects": [],
    "basic":["user:pass"],
    "ip_restrictions":[]
}
4. Modifying nuxt.config.ts
To load the API domain from the environment variable configuration file, we will update the nuxt.config.ts file. Additionally, we will set the site title in the header to make it clear that the environment variable configuration file is being loaded.
const environment = process.env.APP_ENV;
const envSettings = require(`./env.${environment}.js`);

// https://nuxt.com/docs/api/configuration/nuxt-config
export default defineNuxtConfig({
  ssr: false,
  runtimeConfig: {
      // Public keys that are exposed to the client
      public: {
          apiBase: envSettings.API_BASE
      }
  },
  app: {
    head: {
      title: envSettings.SITE_TITLE,
    },
  },
})
5. Add a YAML file for the stage site
Next, add a YAML file to make the Github Actions work when you push changes in the stg branch.
Click [External system integration] -> [GitHub] and copy the content in the GitHub Actions workflow file staging site text area.

Create a .github/workflows/staging.yml file with the copied contents
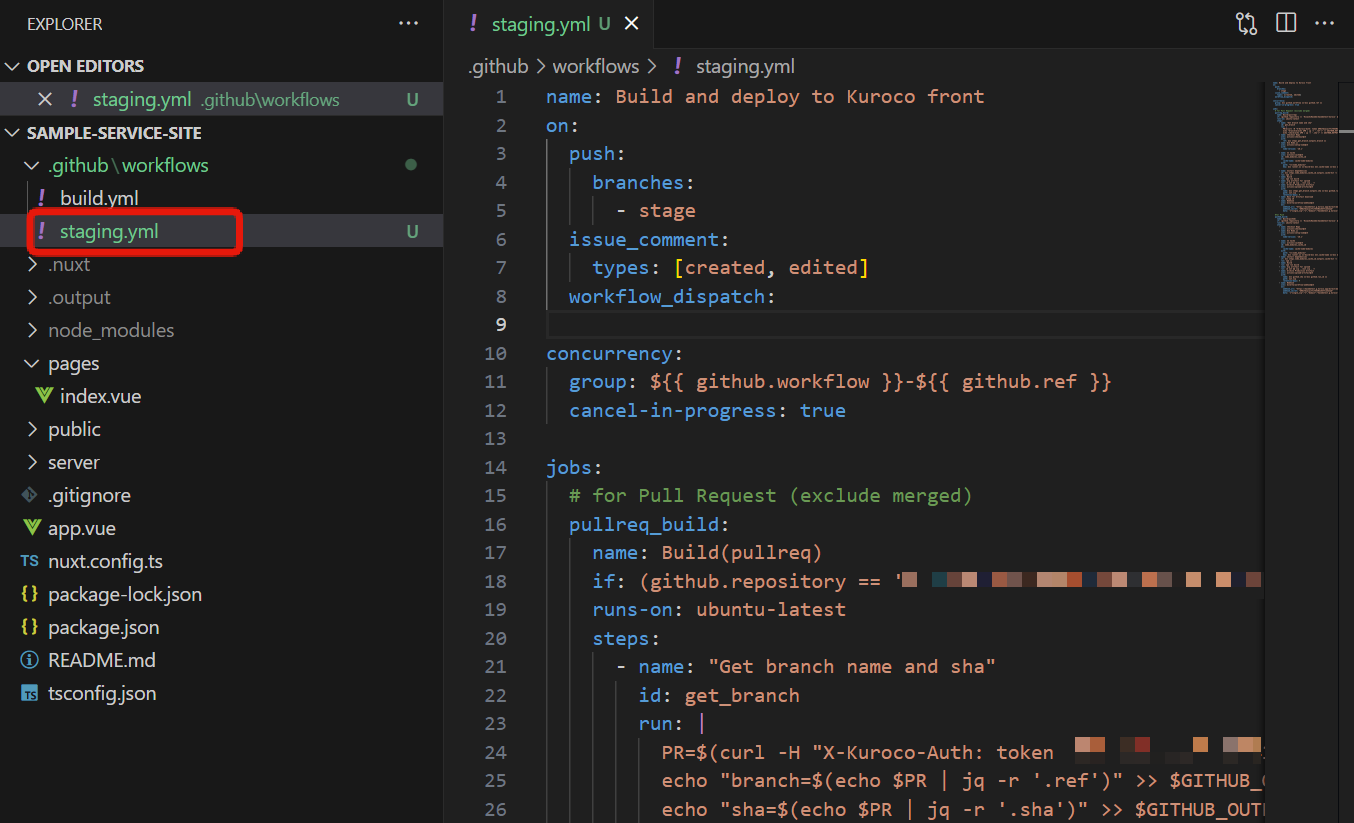
In addition, make the following modifications to the staging.yml file.
-
Rename the Github Actions
Change the first line to the following.
name: Build and deploy to Kuroco front(stg) -
Change the branch that triggers the Github Actions execution
replace the text followingbranches:in the build.yml file with the branch name of your staging site. For this tutorial, we are changing this text fromstagetostg. -
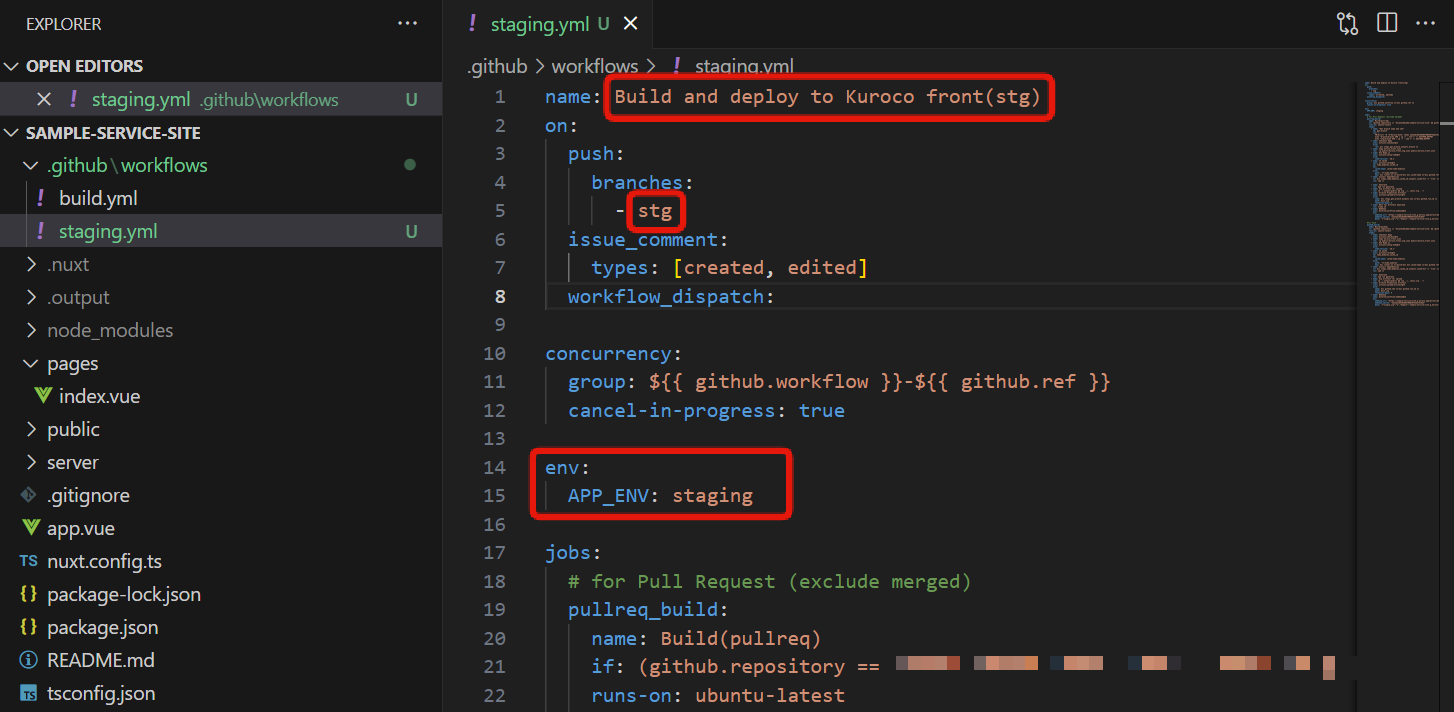
Specify the environment using env
Add the following statement just before jobs: in .github/workflows/staging.ymlenv:
APP_ENV: staging -
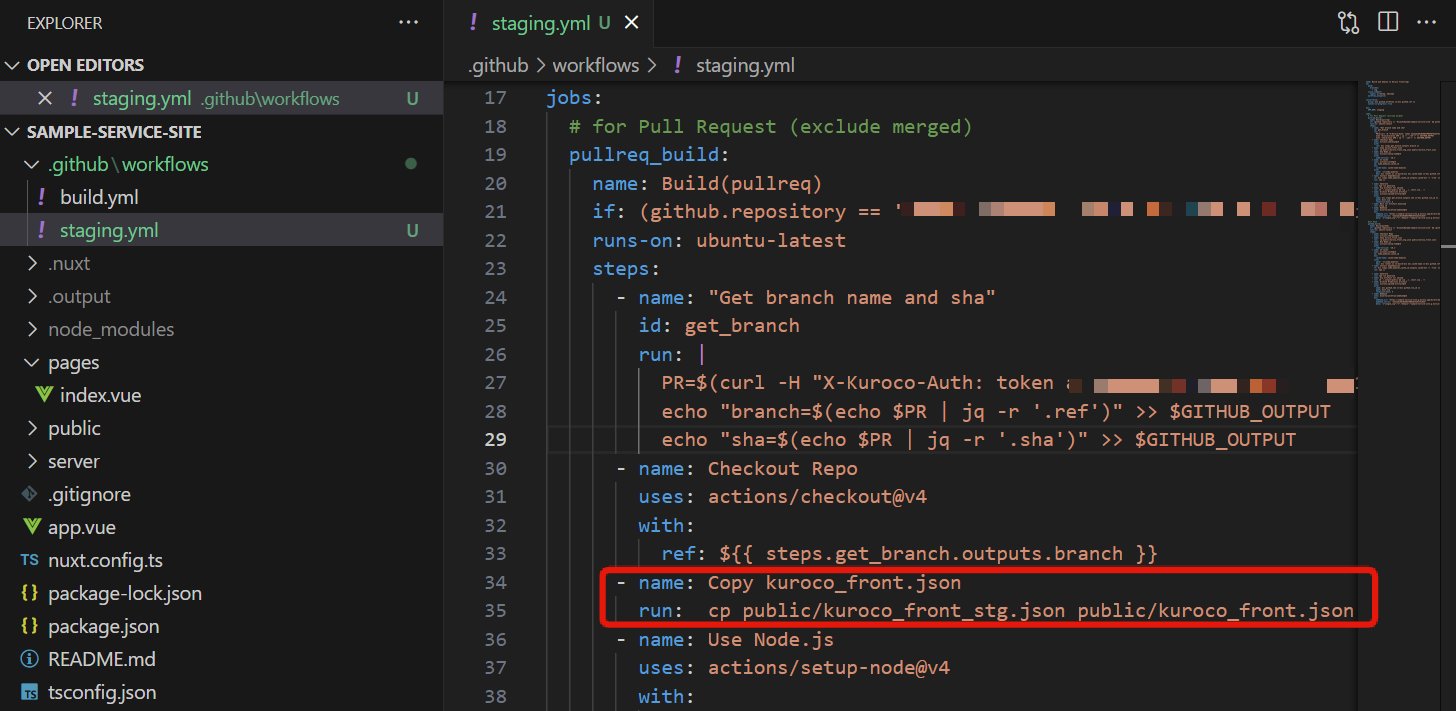
Using kuroco_front.json for stage sites
The JSON file for using KurocoFront iskuroco_front.json.
Therefore, we will add code to the YAML file to copykuroco_front_stg.jsontokuroco_front.json, so thatkuroco_front_stg.jsonwill be used only whenstaging.ymlis executed.
Add the following description just before- name: Use Node.jsin.github/workflows/staging.yml. (2 places)- name: Copy kuroco_front.json
run: cp public/kuroco_front_stg.json public/kuroco_front.json
The staging.yml file should look like this.
Save the file after the modification.
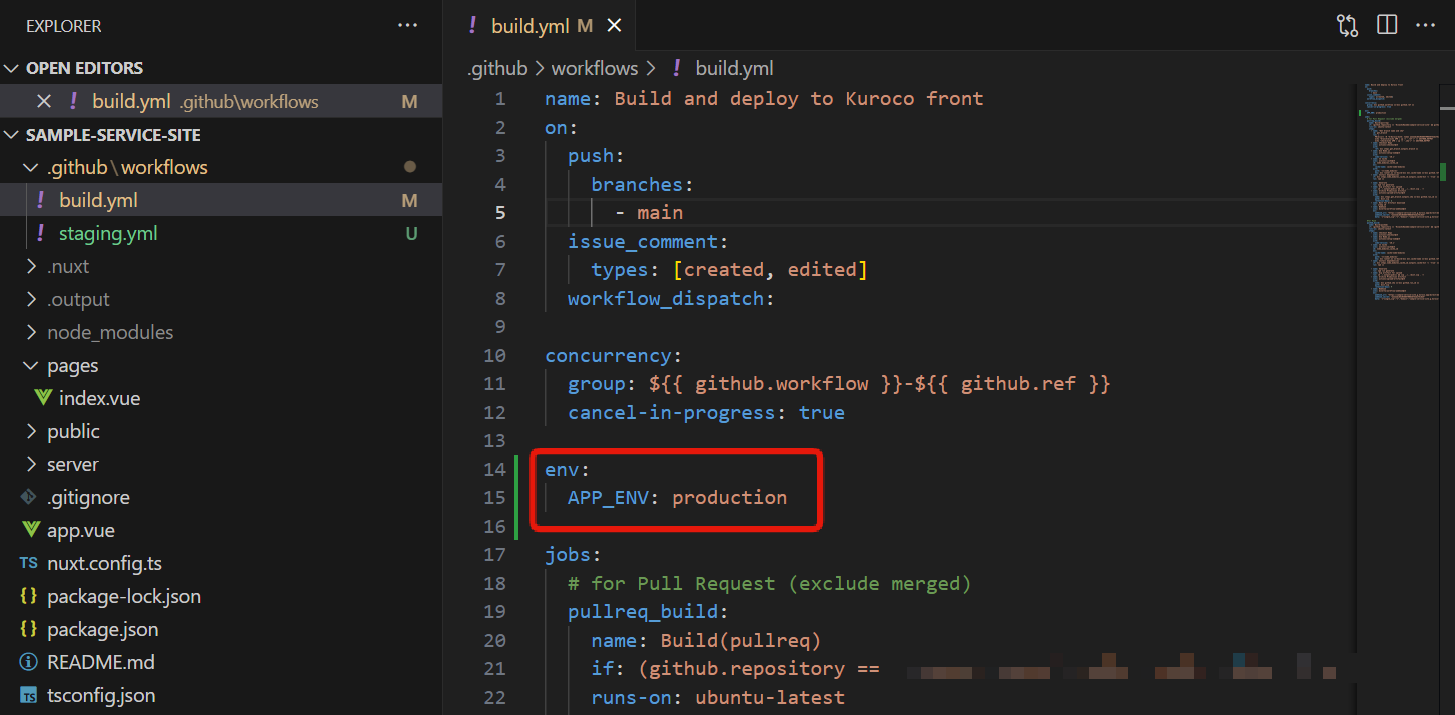
6. Updating the build.yml File
Since we have modified the configuration to load the API domain from environment variables, we will also add code to specify the environment variables in the production build.yml file.
- Specify the environment using env
Add the following statement just before jobs: in .github/workflows/staging.ymlenv:
APP_ENV: production
7. Push in the stg branch
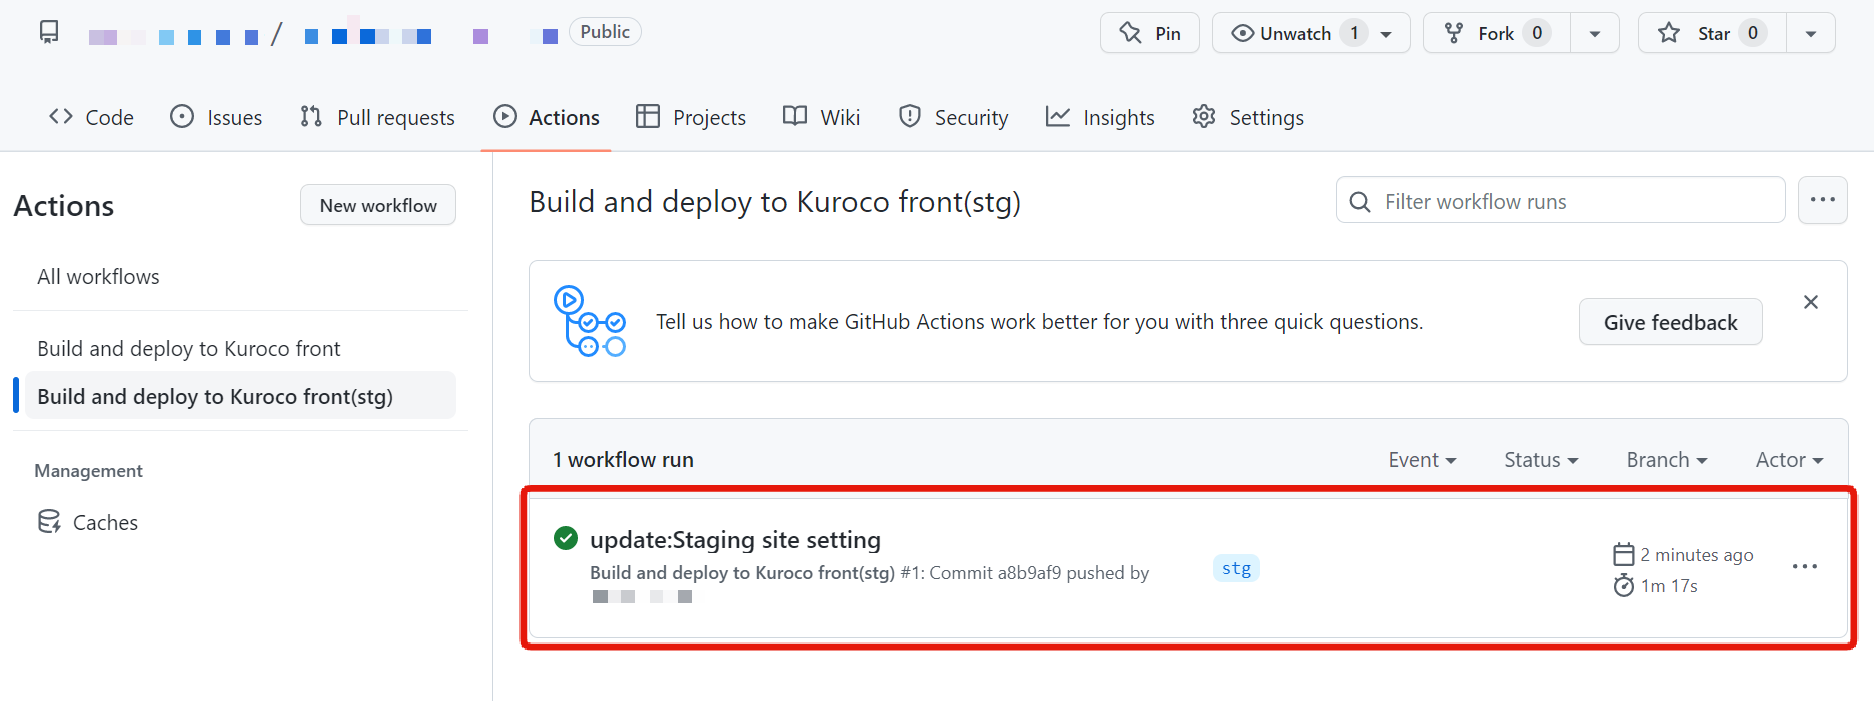
Push the changes to GithHub.
Click on the [Actions] tab on GitHub to check the build status and see that the build is running with the contents of staging.yml.
Once the build is completed, access the staging site from the logo on the Kuroco admin panel.
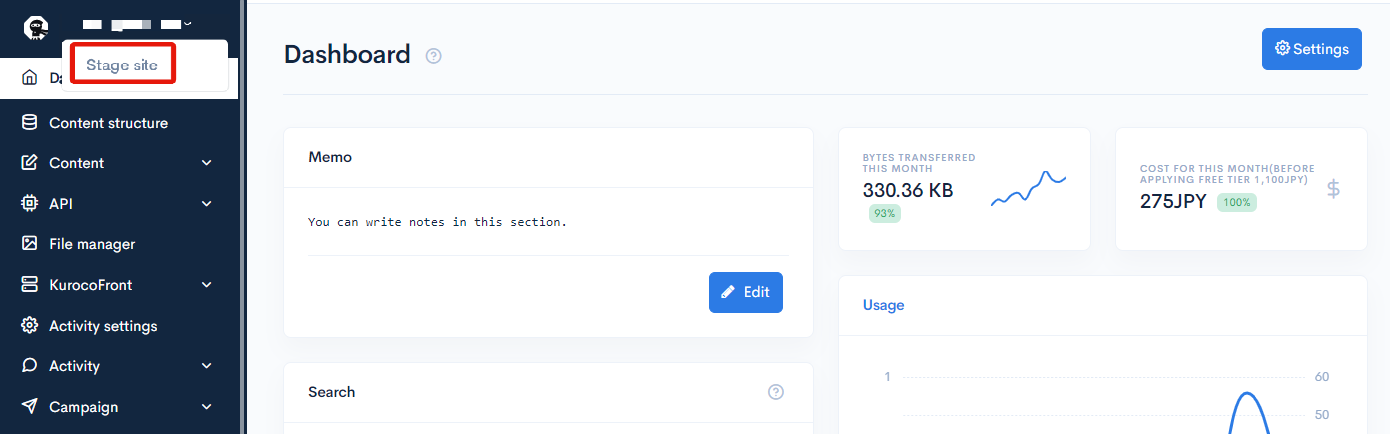
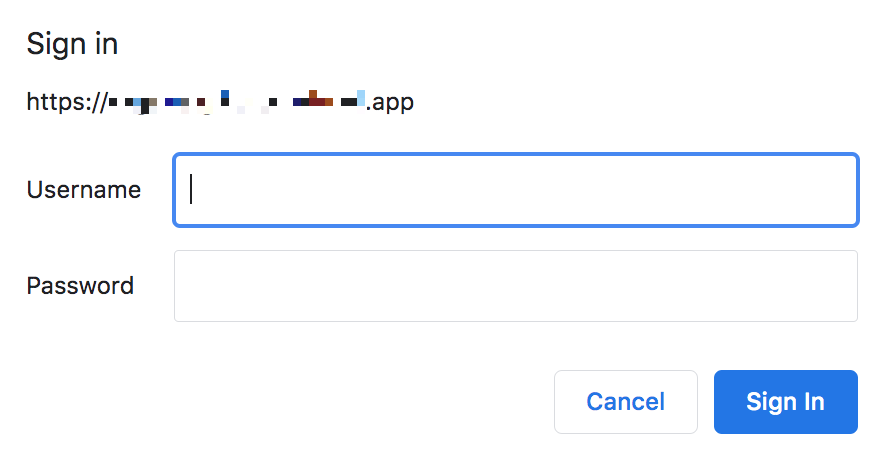
You will see that the staging site now requires basic authentication.
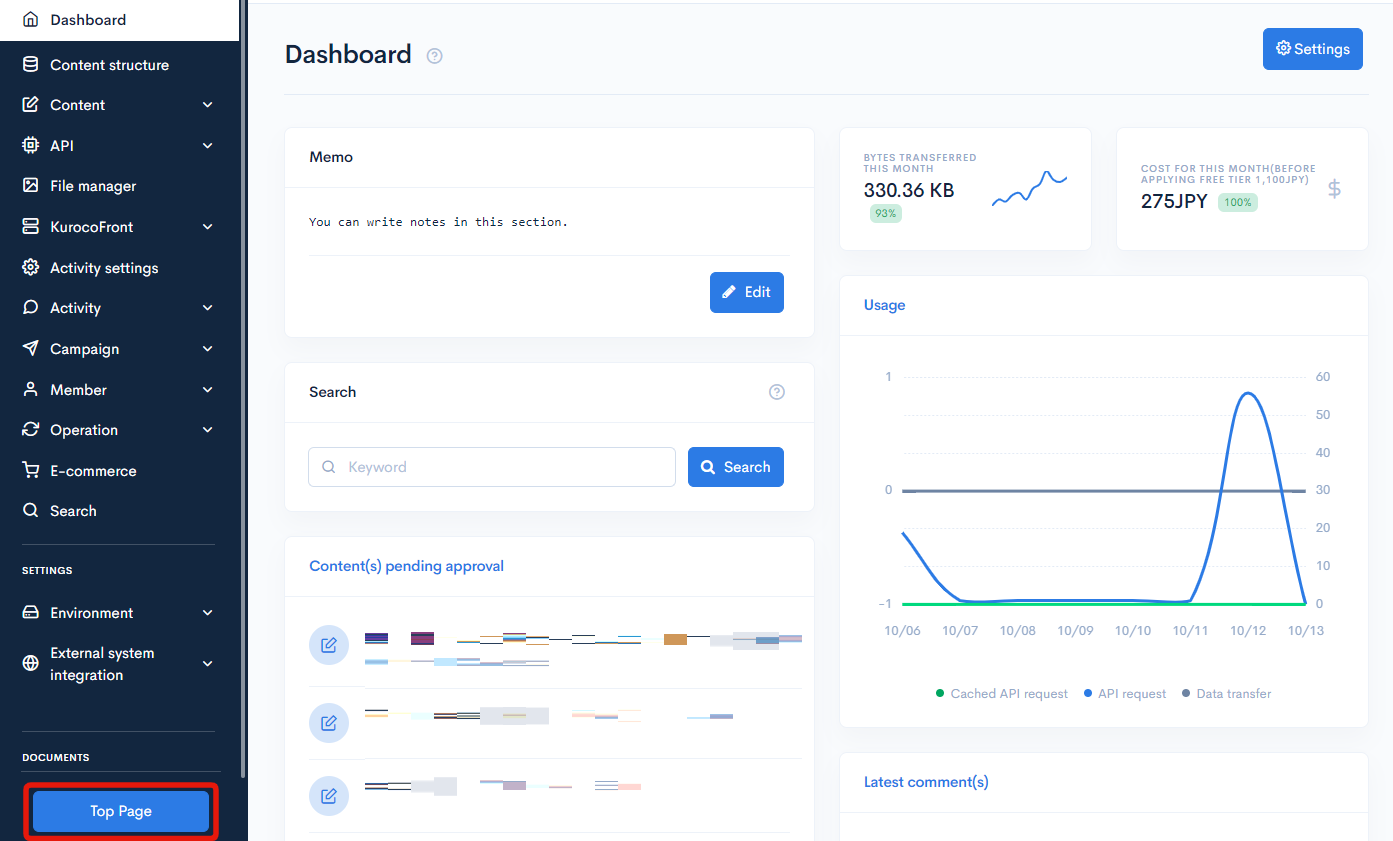
Click [Top page] in Kuroco to open the production site, which does not require basic authentication. As expected, the production site will not reflect any updates to the stg branch.
8. Merging changes in the stg branch into the main branch
Finally, merge the above into the main branch.
This completes the stage site setup.
The staging domain (https://SITE-KEY.g.kuroco-front.app) will now reflect any changes to the staging site in the stg branch.
Setting up Development Environment
1. Create dev branch
Separate the production and development environments on GitHub branches. After moving to the target directory, execute the following command from the command line.
git checkout -b dev
2. Adding a Subsite
Next, to separate the backend from the development environment, we will create a subsite from the Kuroco management screen.
Creating a Subsite
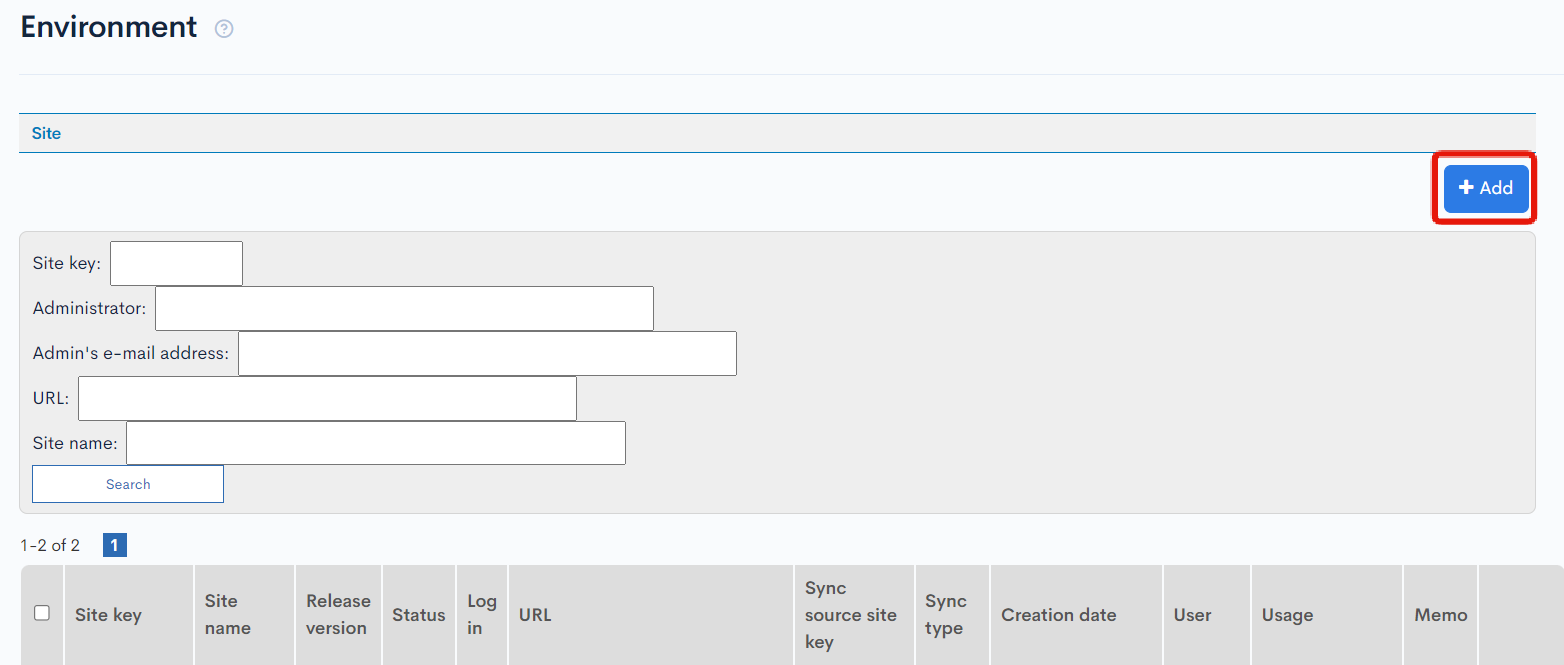
Click on [Environment Settings] -> [Site List].
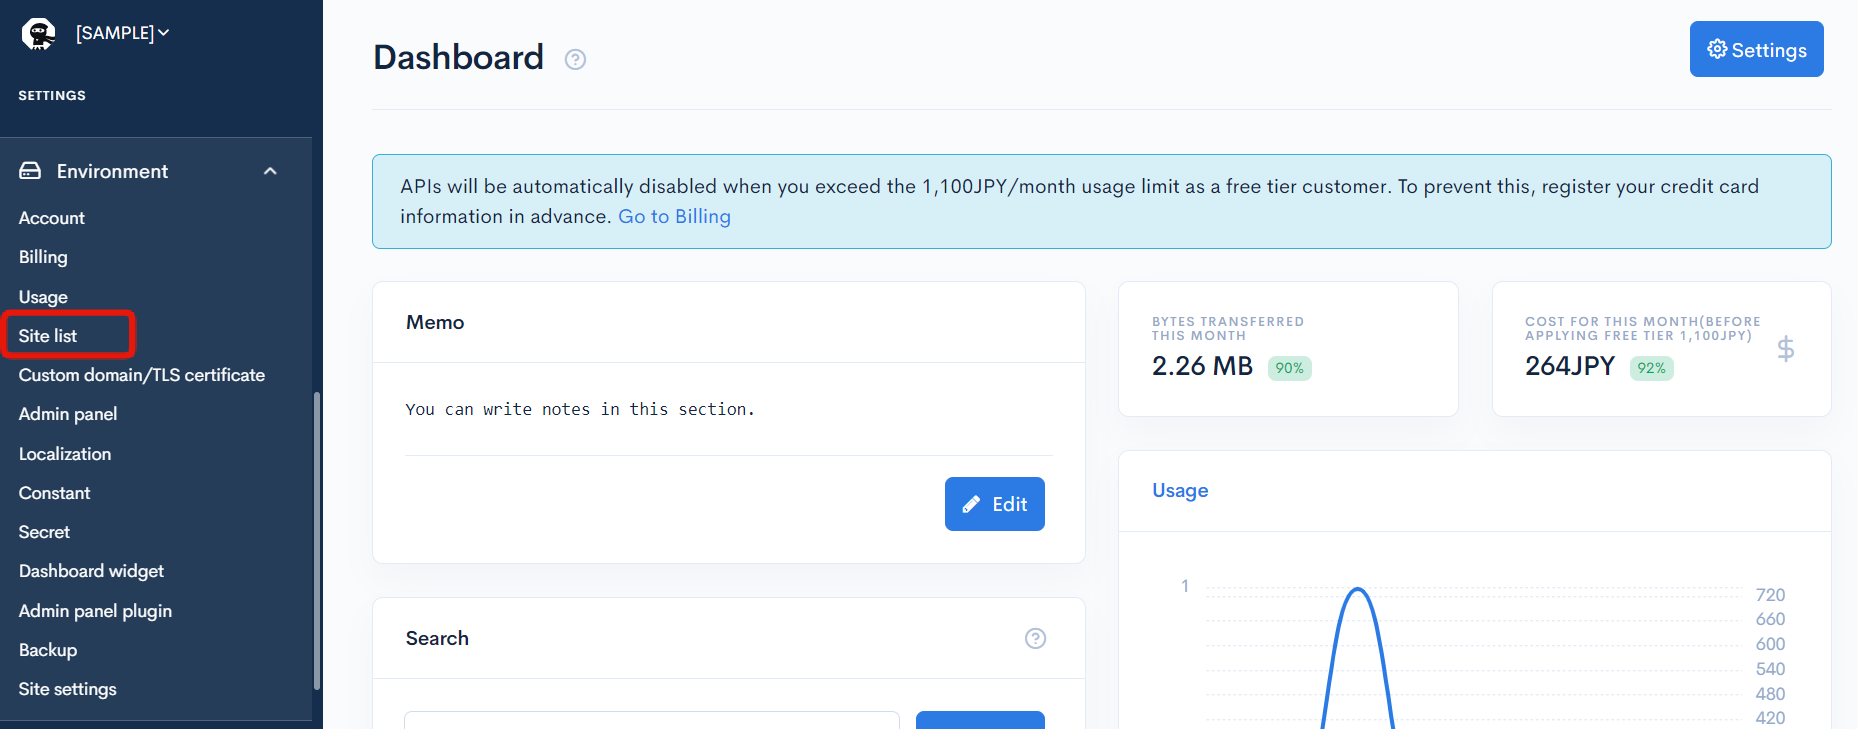
Click on [Add].
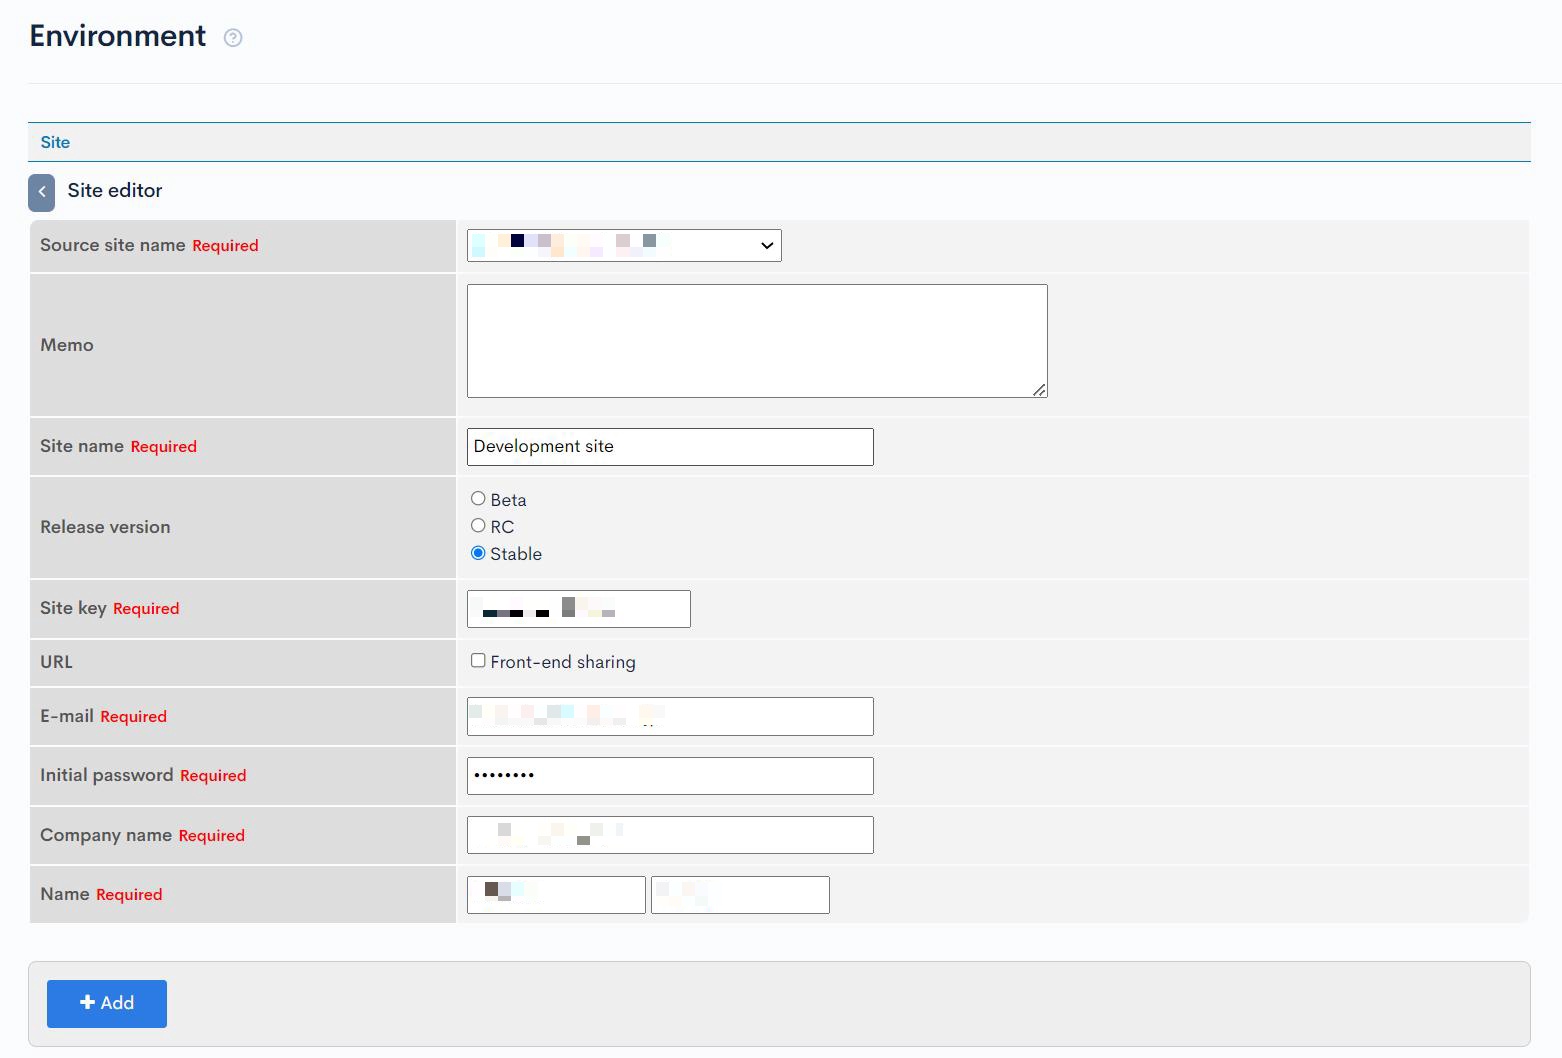
Please click [Add] after setting as follows:
| Item | Setting |
|---|---|
| Source site name | Select the production environment site |
| Site name | Development site |
| Site key | Any site key |
| Email address | Destination for completion email of site construction |
| Initial password | Any password |
| Company name | Your company name |
| Name | Your name |
GitHub Integration
After creating the subsite, connect it to GitHub. Click [External system integration] -> [GitHub].
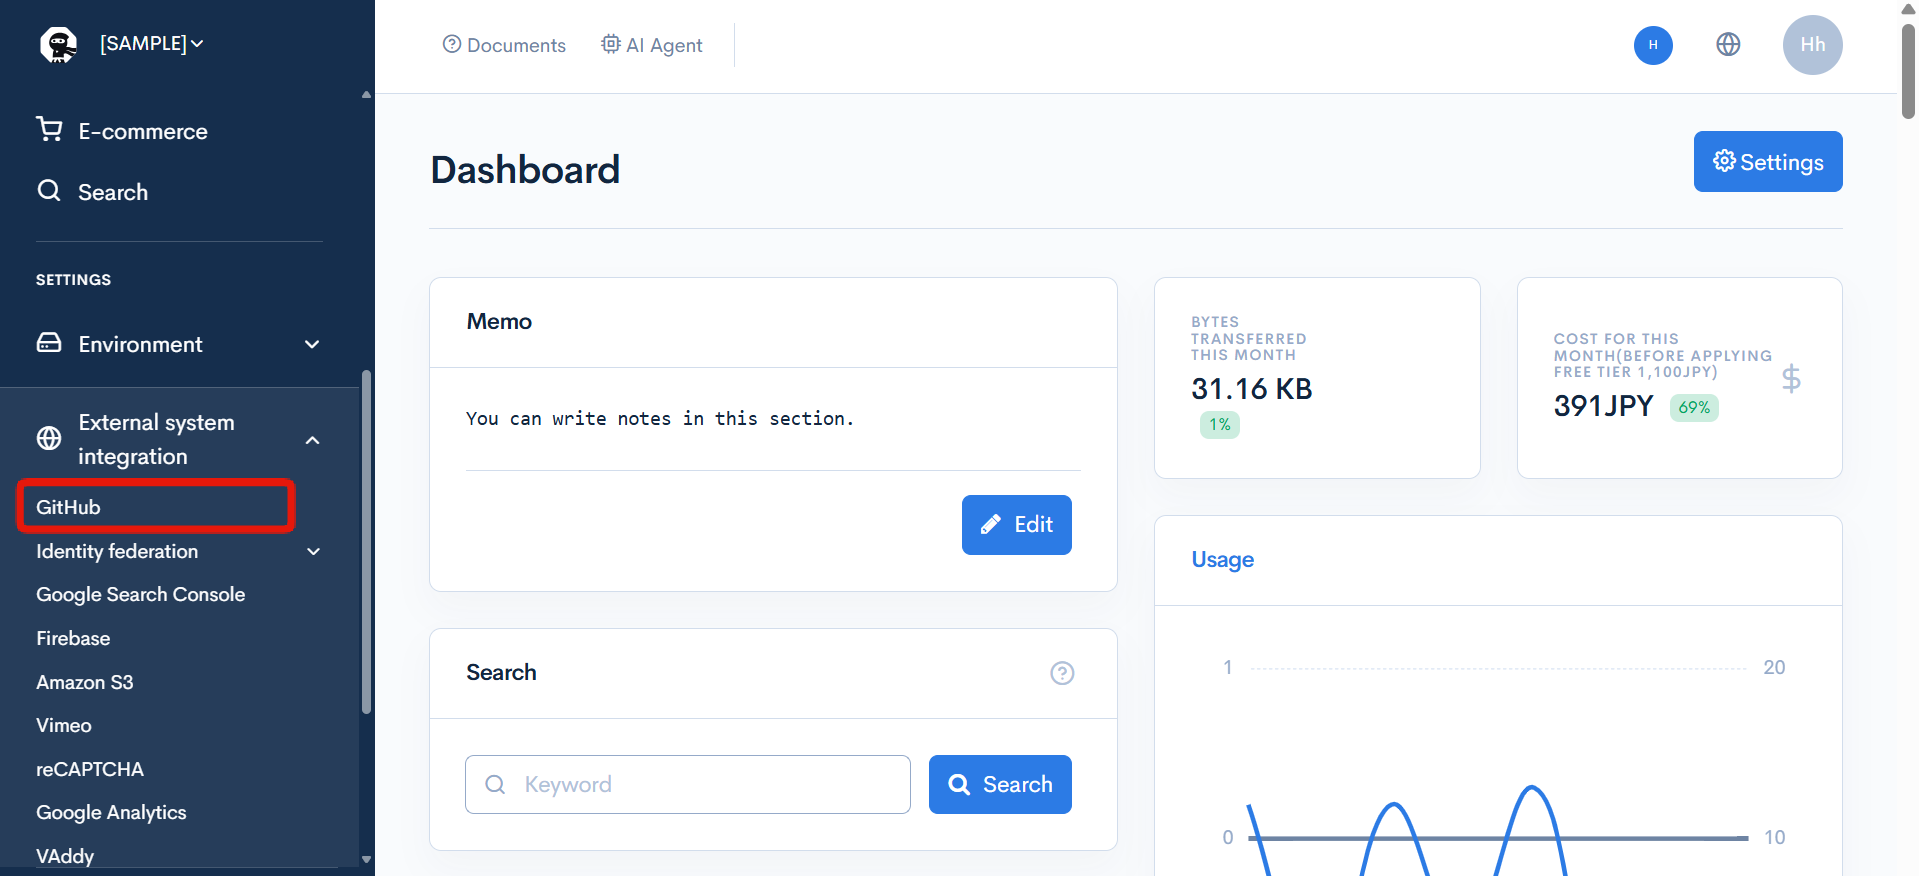
Click [Authorize GitHub Repository] and integrate with GitHub.
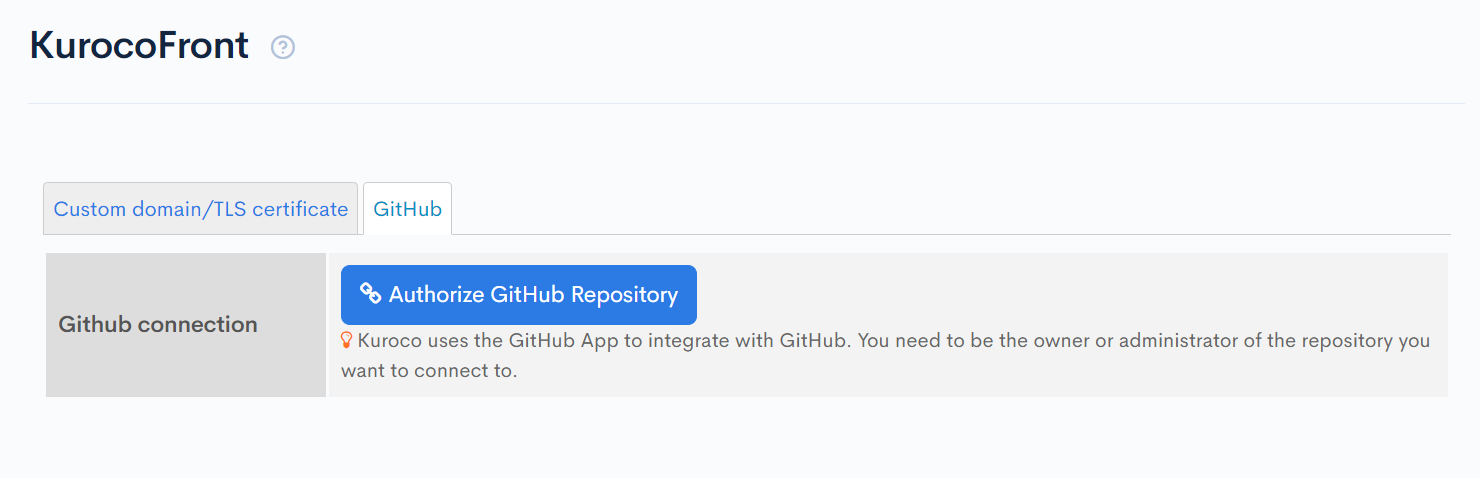
After connecting with GitHub, set the repository to the same as the production environment repository and click [Update].
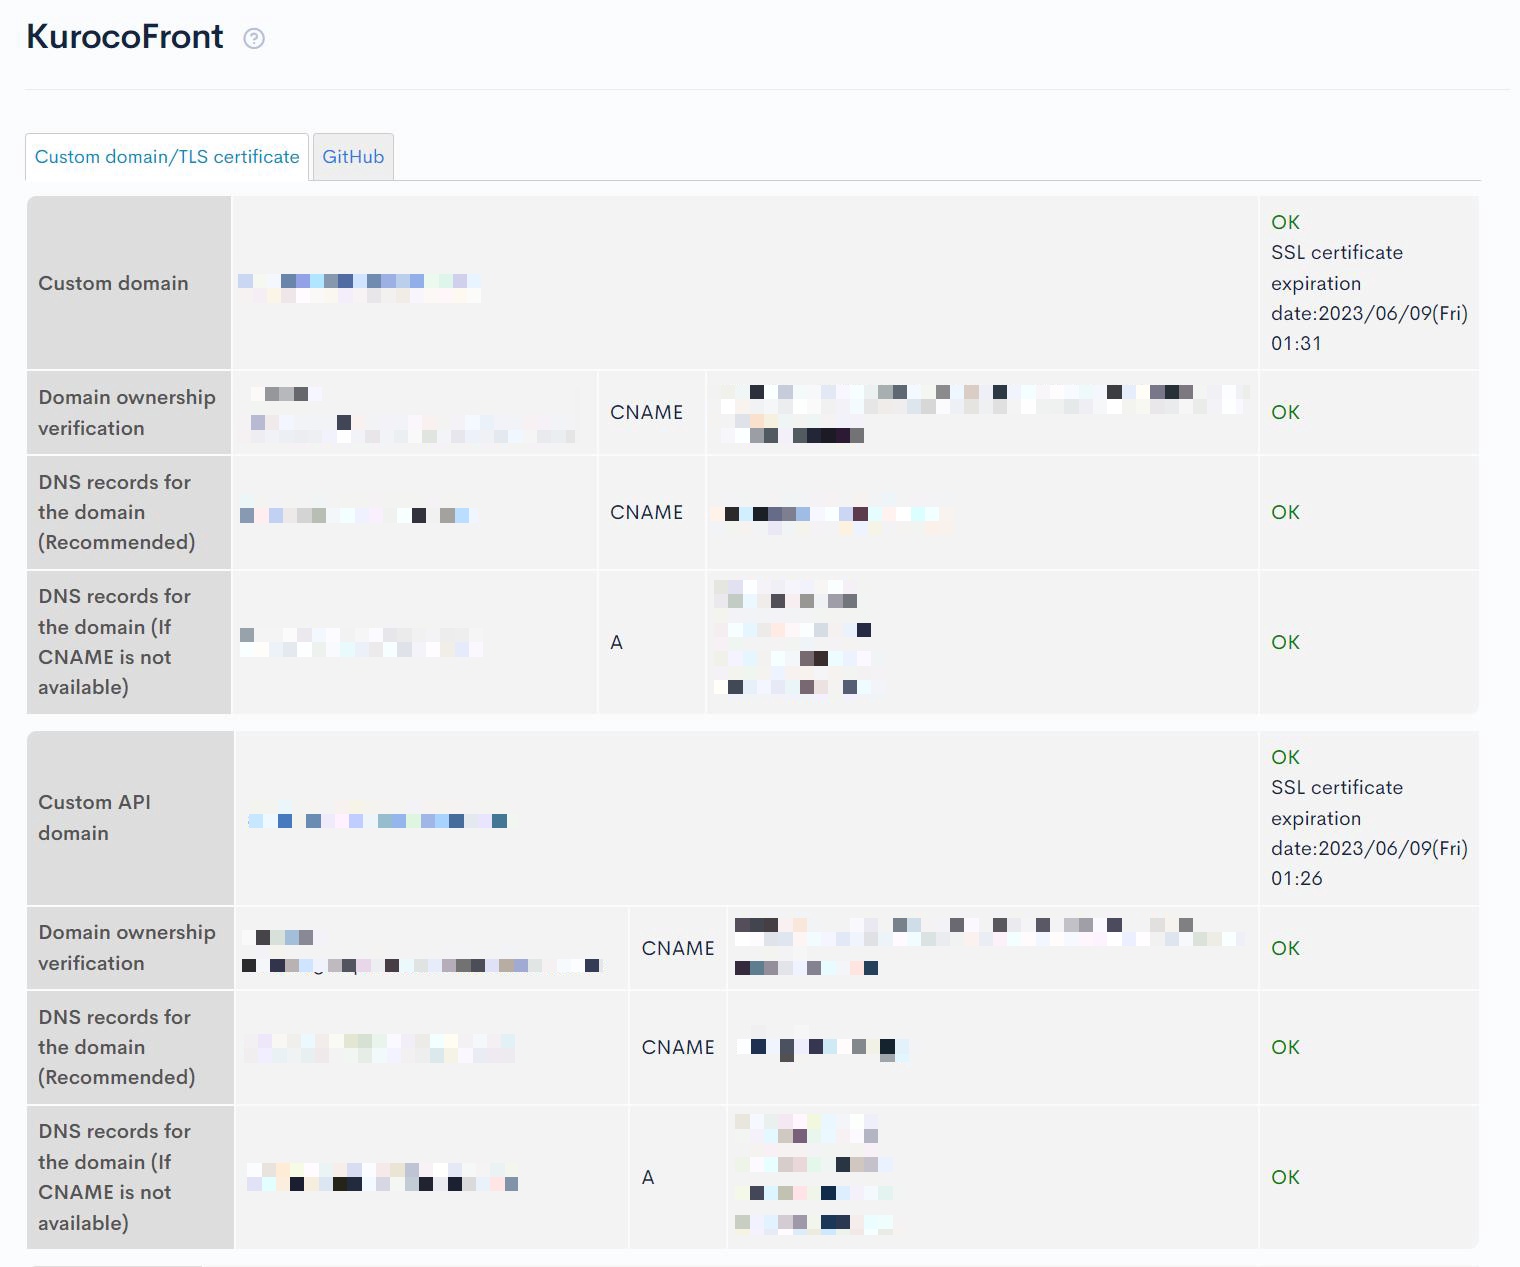
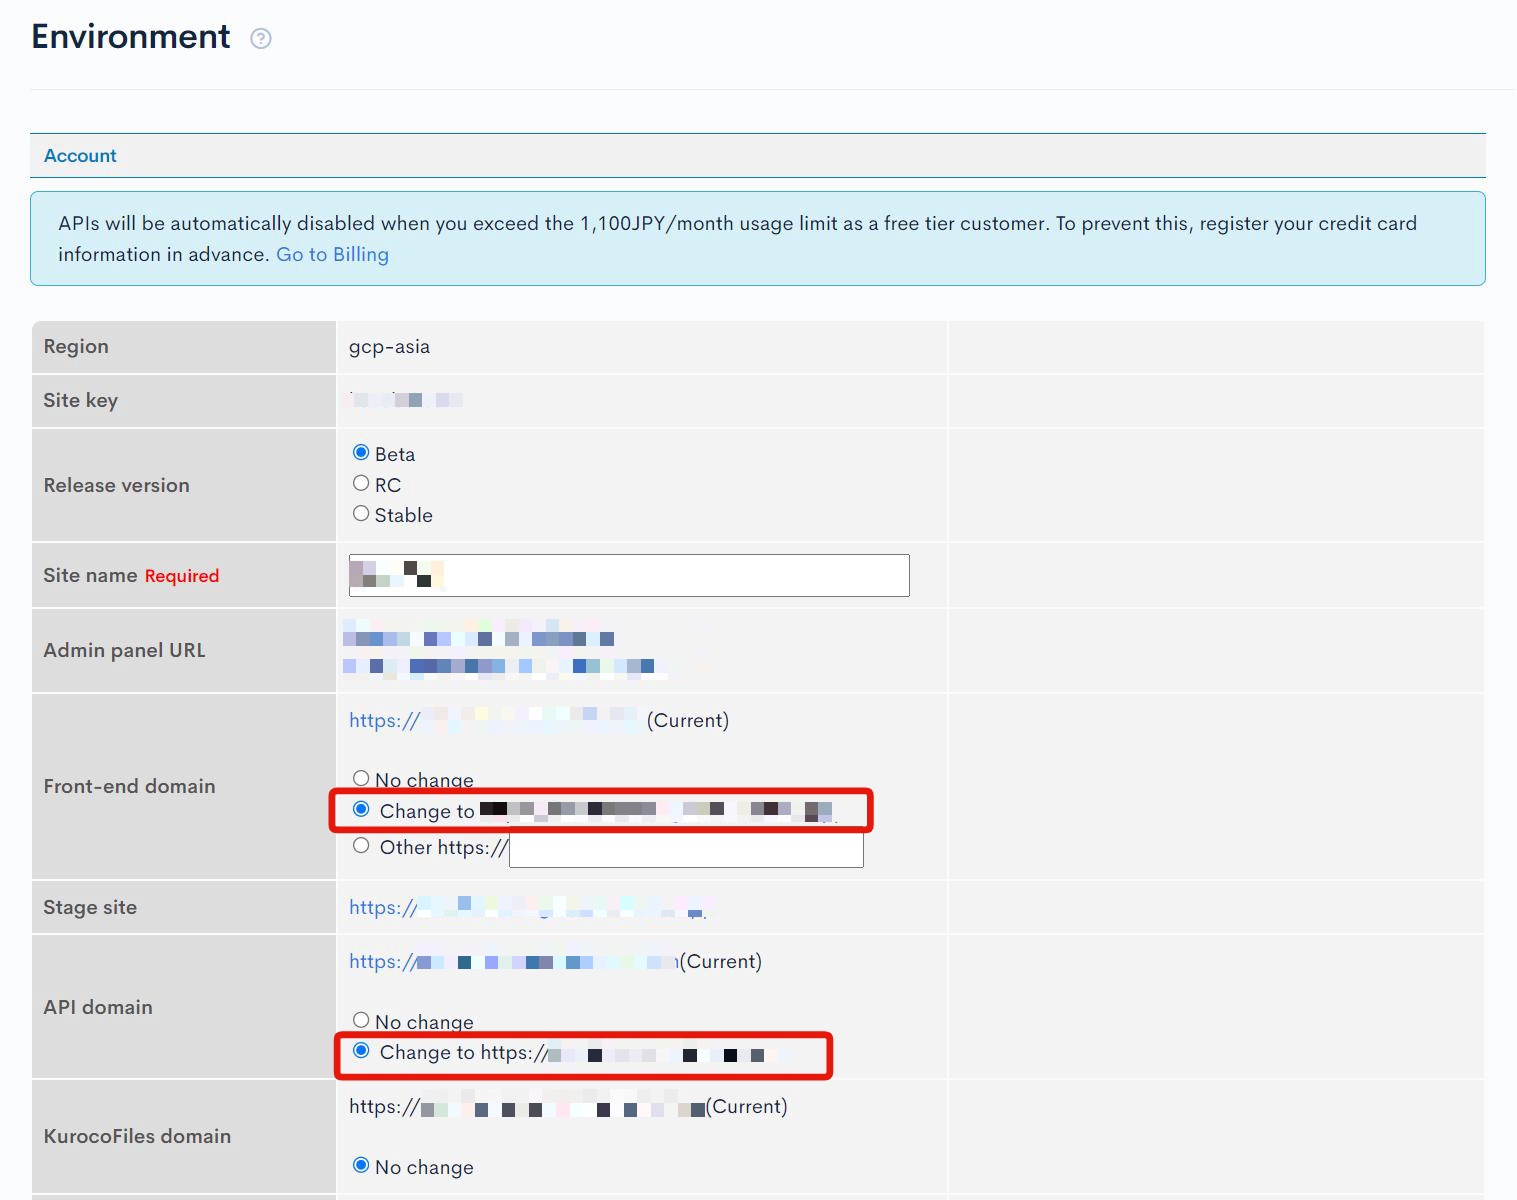
3. Setting Up a Custom Domain and Custom API Domain
Set up a custom domain and custom API domain for the development environment. Set up the custom domain and custom API domain for the development environment from [Environment Settings] -> [Custom Domain/TLS Certificates].
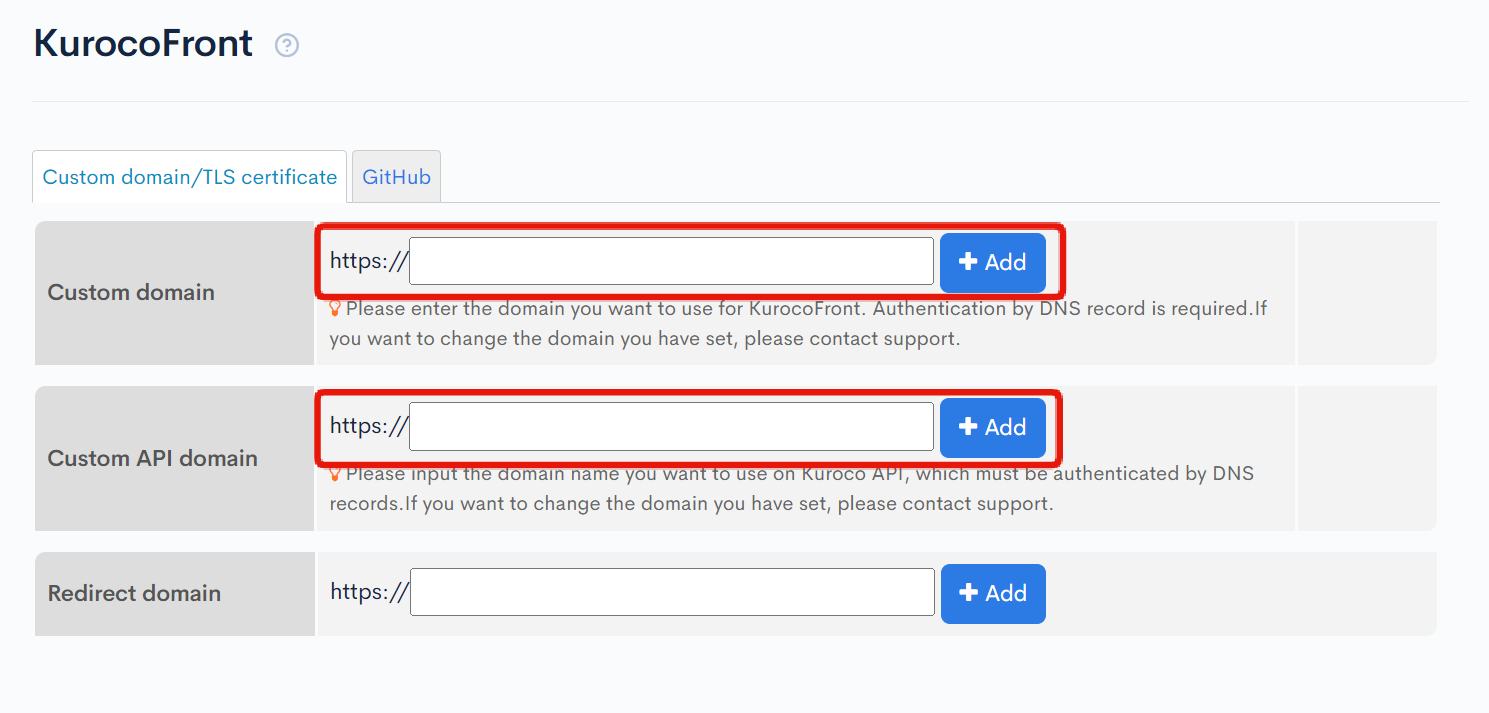
Once the DNS settings are reflected and everything shows OK, the setup is complete.
Go to Environment Settings -> Account Settings and change the Front-end domain and API Domain.
4. Creating Environment Variable Configuration Files
Create the environment variable configuration file for the development environment as follows.
Please replace the part that says YOUR_DEV_SITE_KEY with your own site key.
env.development.js
module.exports = {
  API_BASE: 'https://YOUR_DEV_SITE_KEY.g.kuroco.app',
  SITE_TITLE: '[DEV]|Kuroco Sample Site',
  META_TITLE: '[DEV]|Kuroco Sample Site',
  SITE_DESCRIPTION: '[DEV]|A sample site created with reference to the Kuroco Beginner\'s Guide.',
  RSS_SITE_TITLE: '[DEV]|Kuroco Sample',
  RSS_SITE_DESCRIPTION: '[DEV]|Start using Kuroco with the Kuroco Beginner\'s Guide',
  ROBOTS: 'noindex',
}
5. Create kuroco_front_dev.json for development site
To apply BASIC authentication only to the development environment, create kuroco_front_dev.json for the development environment.
Copy /public/kuroco_front.json and create kuroco_front_dev.json.
Describe Basic authentication as follows.
{
    "rewrites": [
        {
          "source": ".*",
          "destination": "/index.html"
        }
      ],
    "redirects": [],
    "basic":["user:pass"],
    "ip_restrictions":[]
}
6. Add a YAML file for the development site
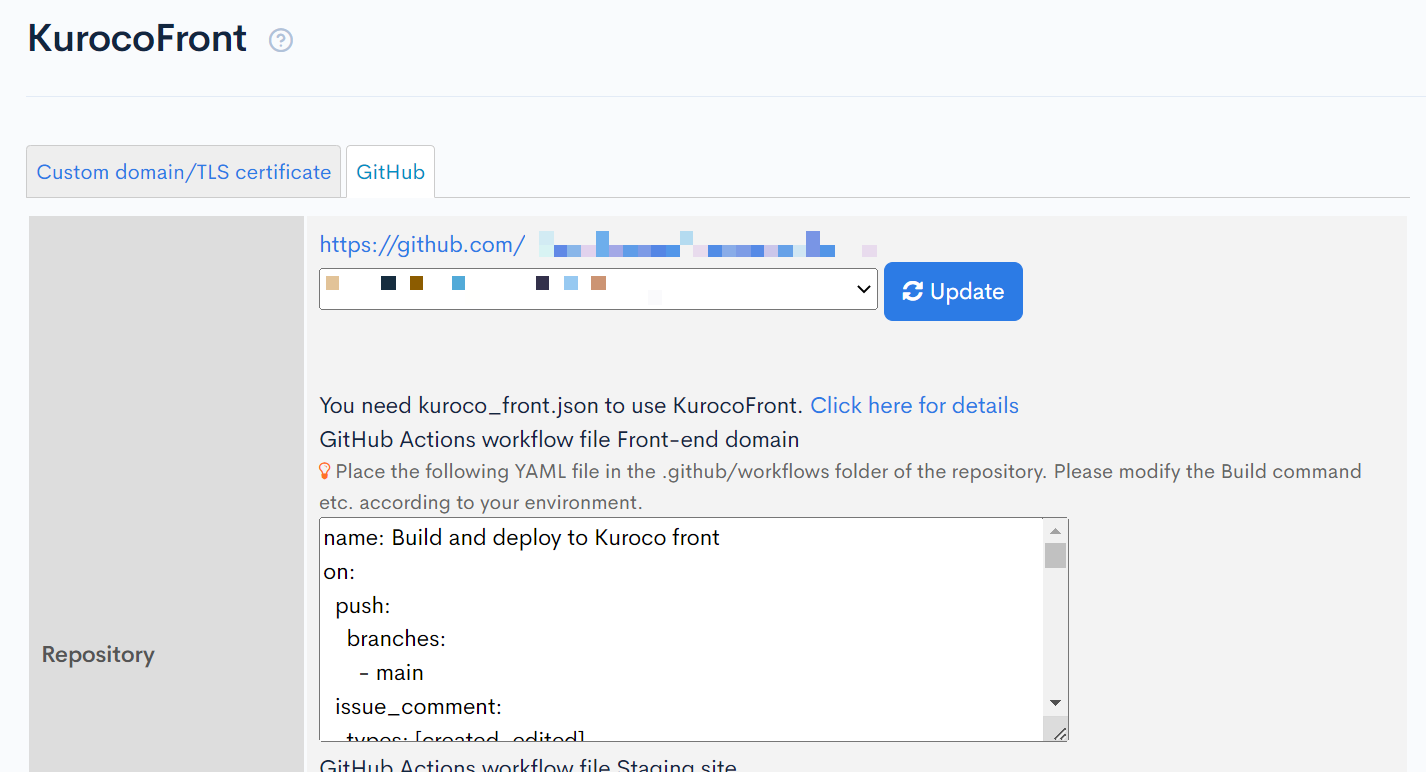
Next, add a YAML file for GitHub Actions to run when changes are pushed to the dev branch. From the Kuroco management screen for the development environment created earlier, click on [External system integration] -> [GitHub]. Copy the contents of the "GitHub Actions workflow file Front-end Domain" text area.
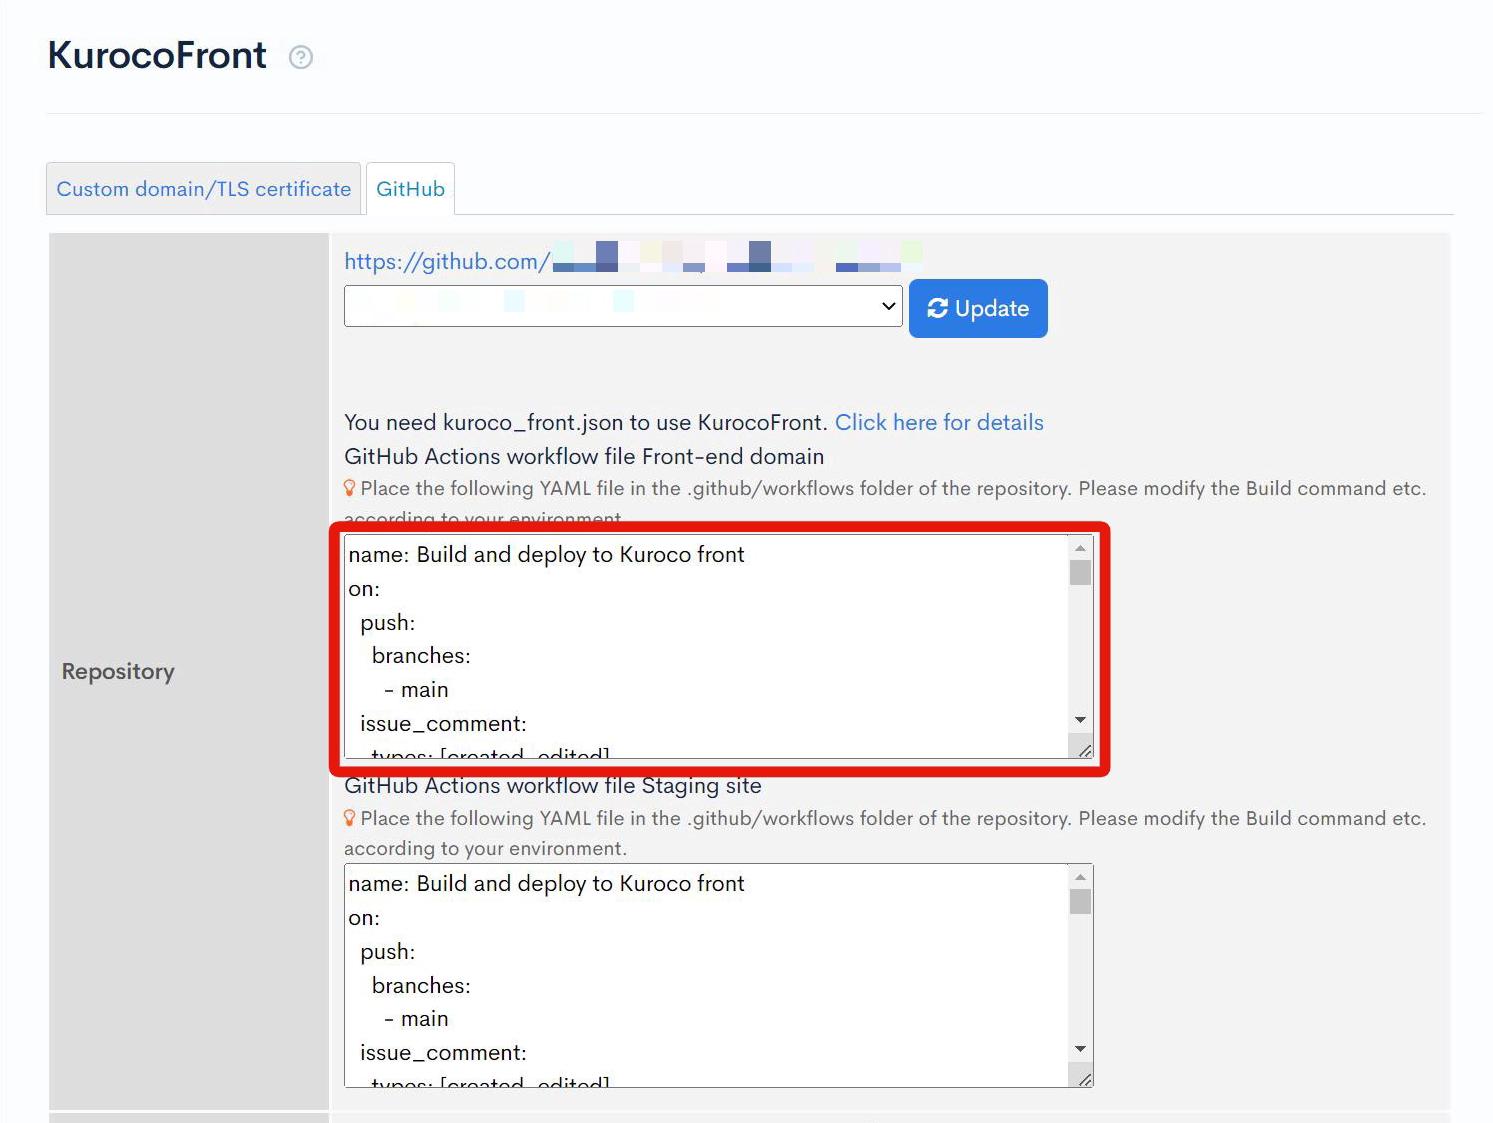
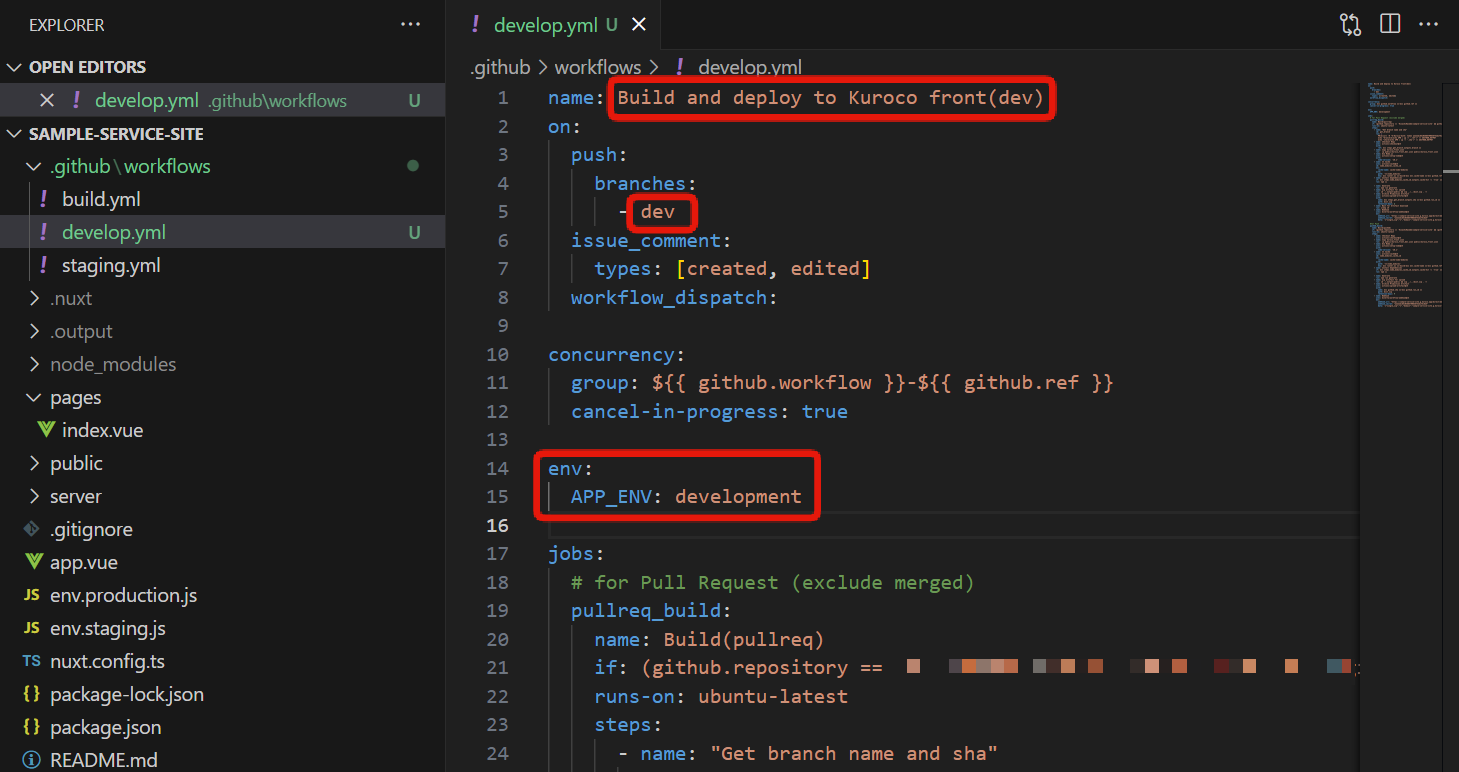
Create a .github/workflows/develop.yml file with the copied content.

Then make the following modifications to the develop.yml file:
-
Change the name of the Github Actions
Change the following line in the first line:name: Build and deploy to Kuroco front(dev) -
Change the branch that triggers Github Actions execution Modify
branches:to the branch name for the development environment. In this case, modify it todev. -
Load GitHub secrets Add the following description before the
jobs:section in.github/workflows/develop.yml:env:
APP_ENV: development -
Use
kuroco_front_dev.jsonfor the development environment The JSON file used to use KurocoFront iskuroco_front.json.
Therefore, add a YAML file description to copykuroco_front_dev.jsontokuroco_front.jsononly whendevelop.ymlis executed.
Add the following description before- name: Use Node.jsin.github/workflows/develop.yml(in two places):- name: Copy kuroco_front.json
run: cp public/kuroco_front_dev.json public/kuroco_front.json
The develop.yml file will be as follows:

Save the file when the modifications are complete.
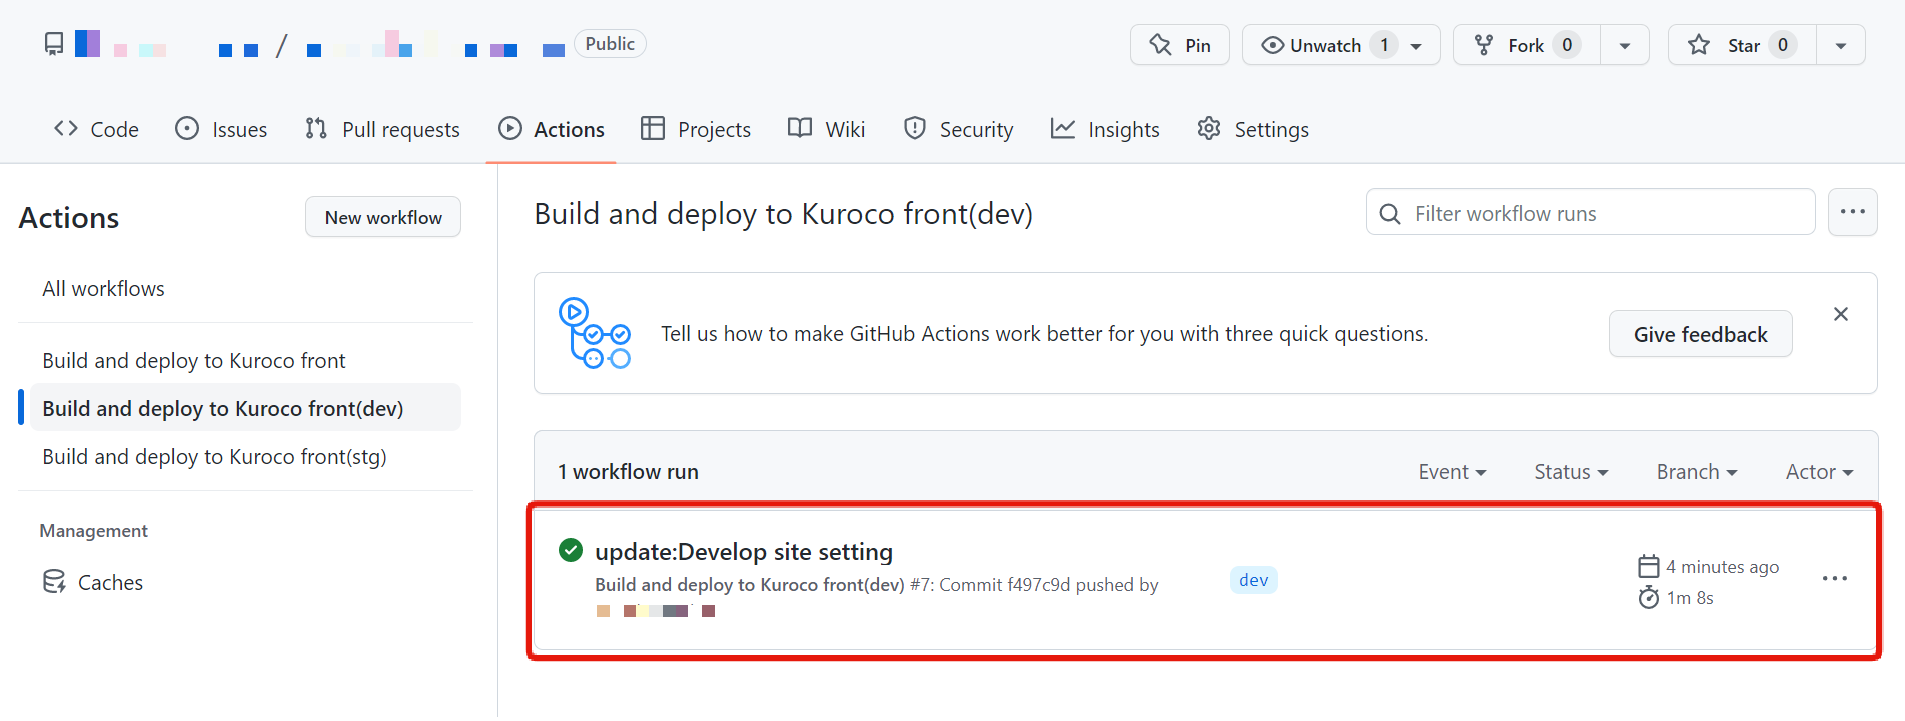
7. Push the dev branch
Push the changes made so far to GitHub. When you click on the "Actions" tab in GitHub, you can check the status of the build and see that the build is being executed with the contents of develop.yml.
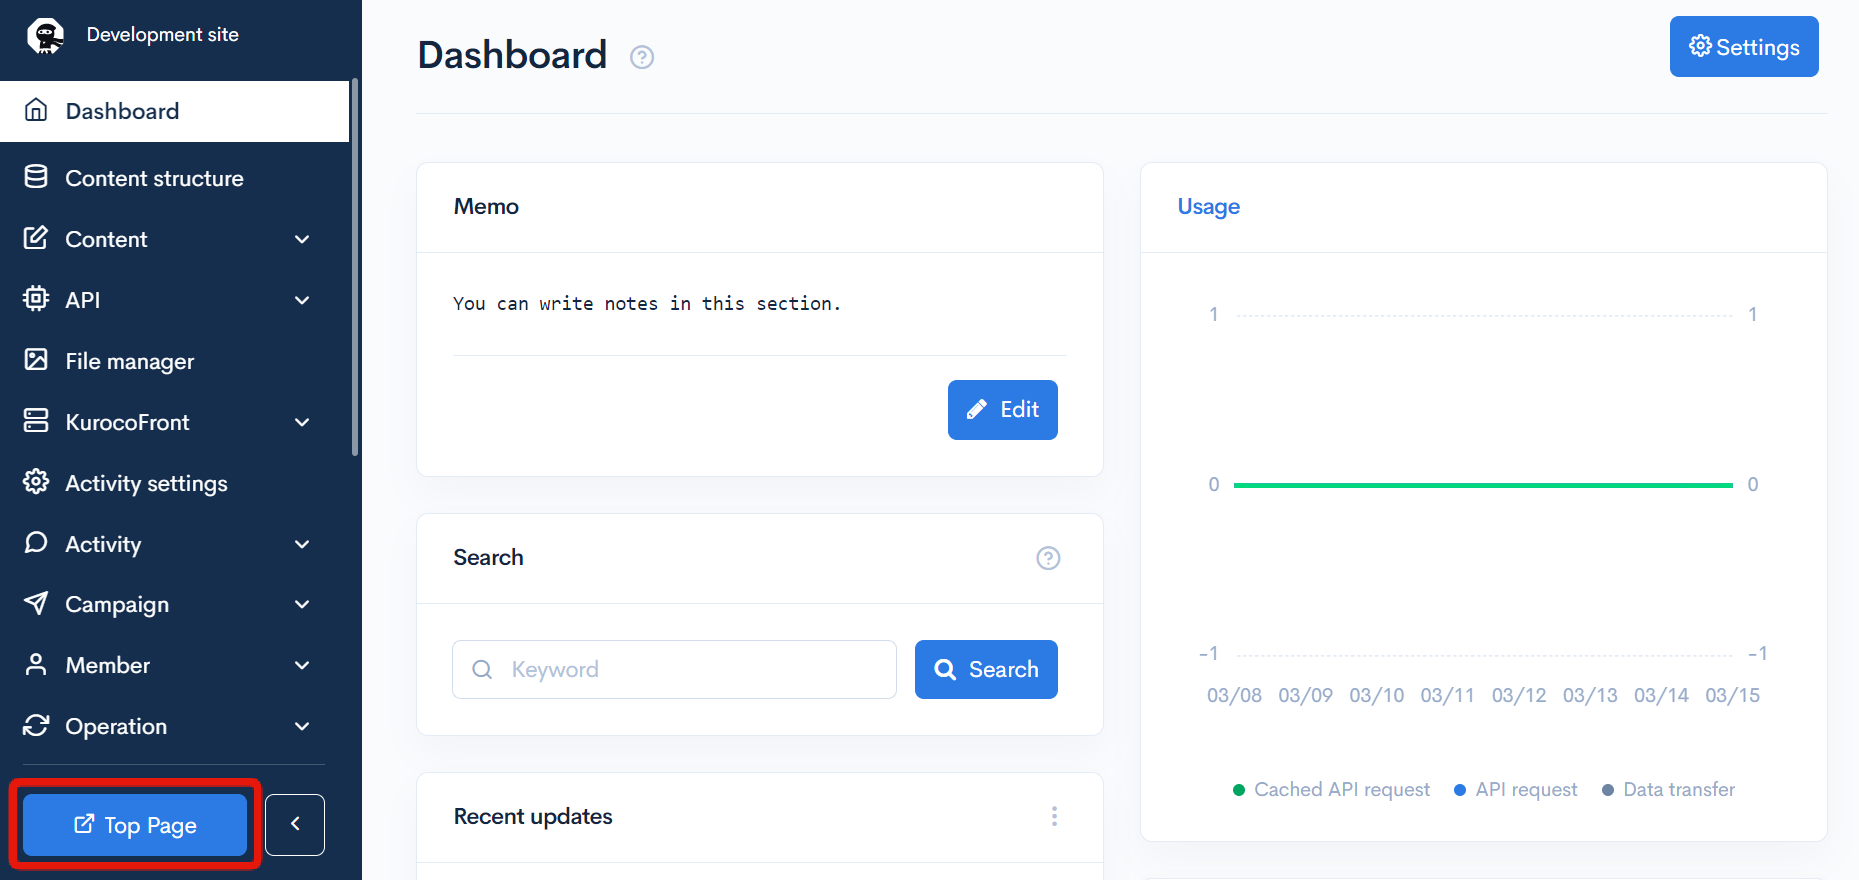
Once the build is complete, access the development environment site from the [View site] button on the Kuroco management screen.
Other than the BASIC authentication, the display will be the same as the production environment.
8. Merge changes from dev branch to main and stg branches
Merge the above contents into the main and stg branches.
With this, the development environment setup is complete. From now on, the changes made in the development environment branch (in this case, dev) and the management screen of the development environment site will be reflected in the development environment site.
Synchronize data between development and production environments
If there is a significant difference in data between the production and development environments, or if you want to reflect updates and additions made in the development environment to the production environment all at once, you can use the synchronization function.
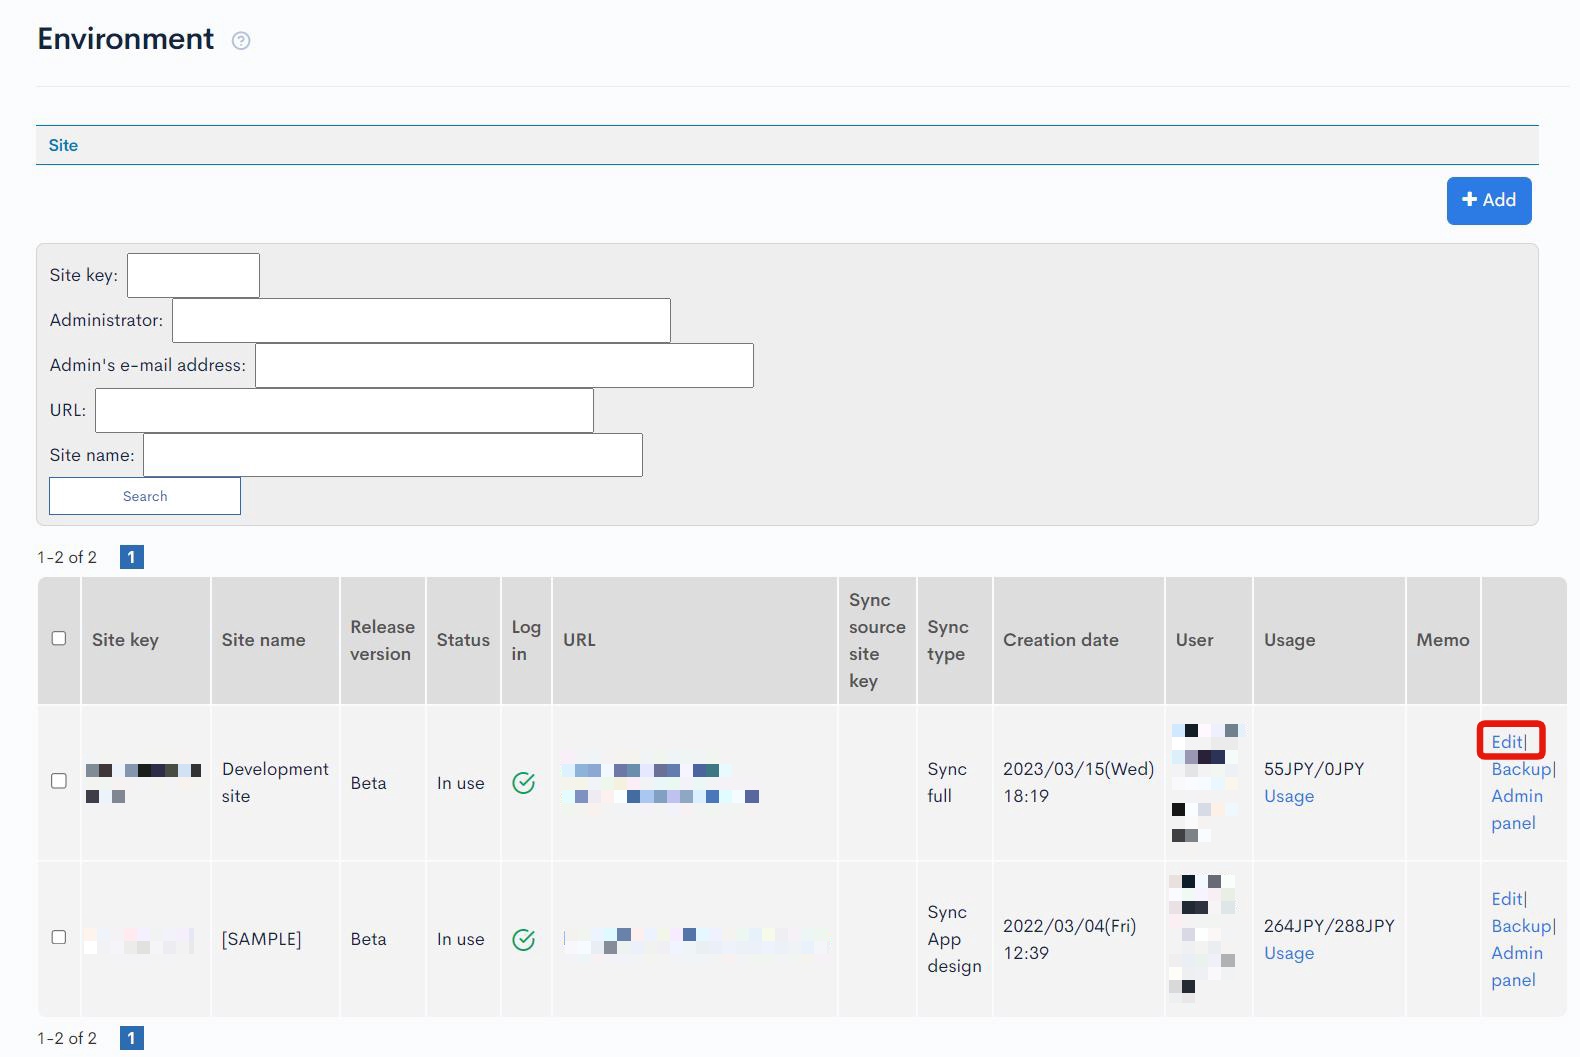
Click [Edit] of the site that will be the synchronization destination from the Site List.
Select the Sync source site key in the Synchronization item, check the "Sync immediately" checkbox, and update.
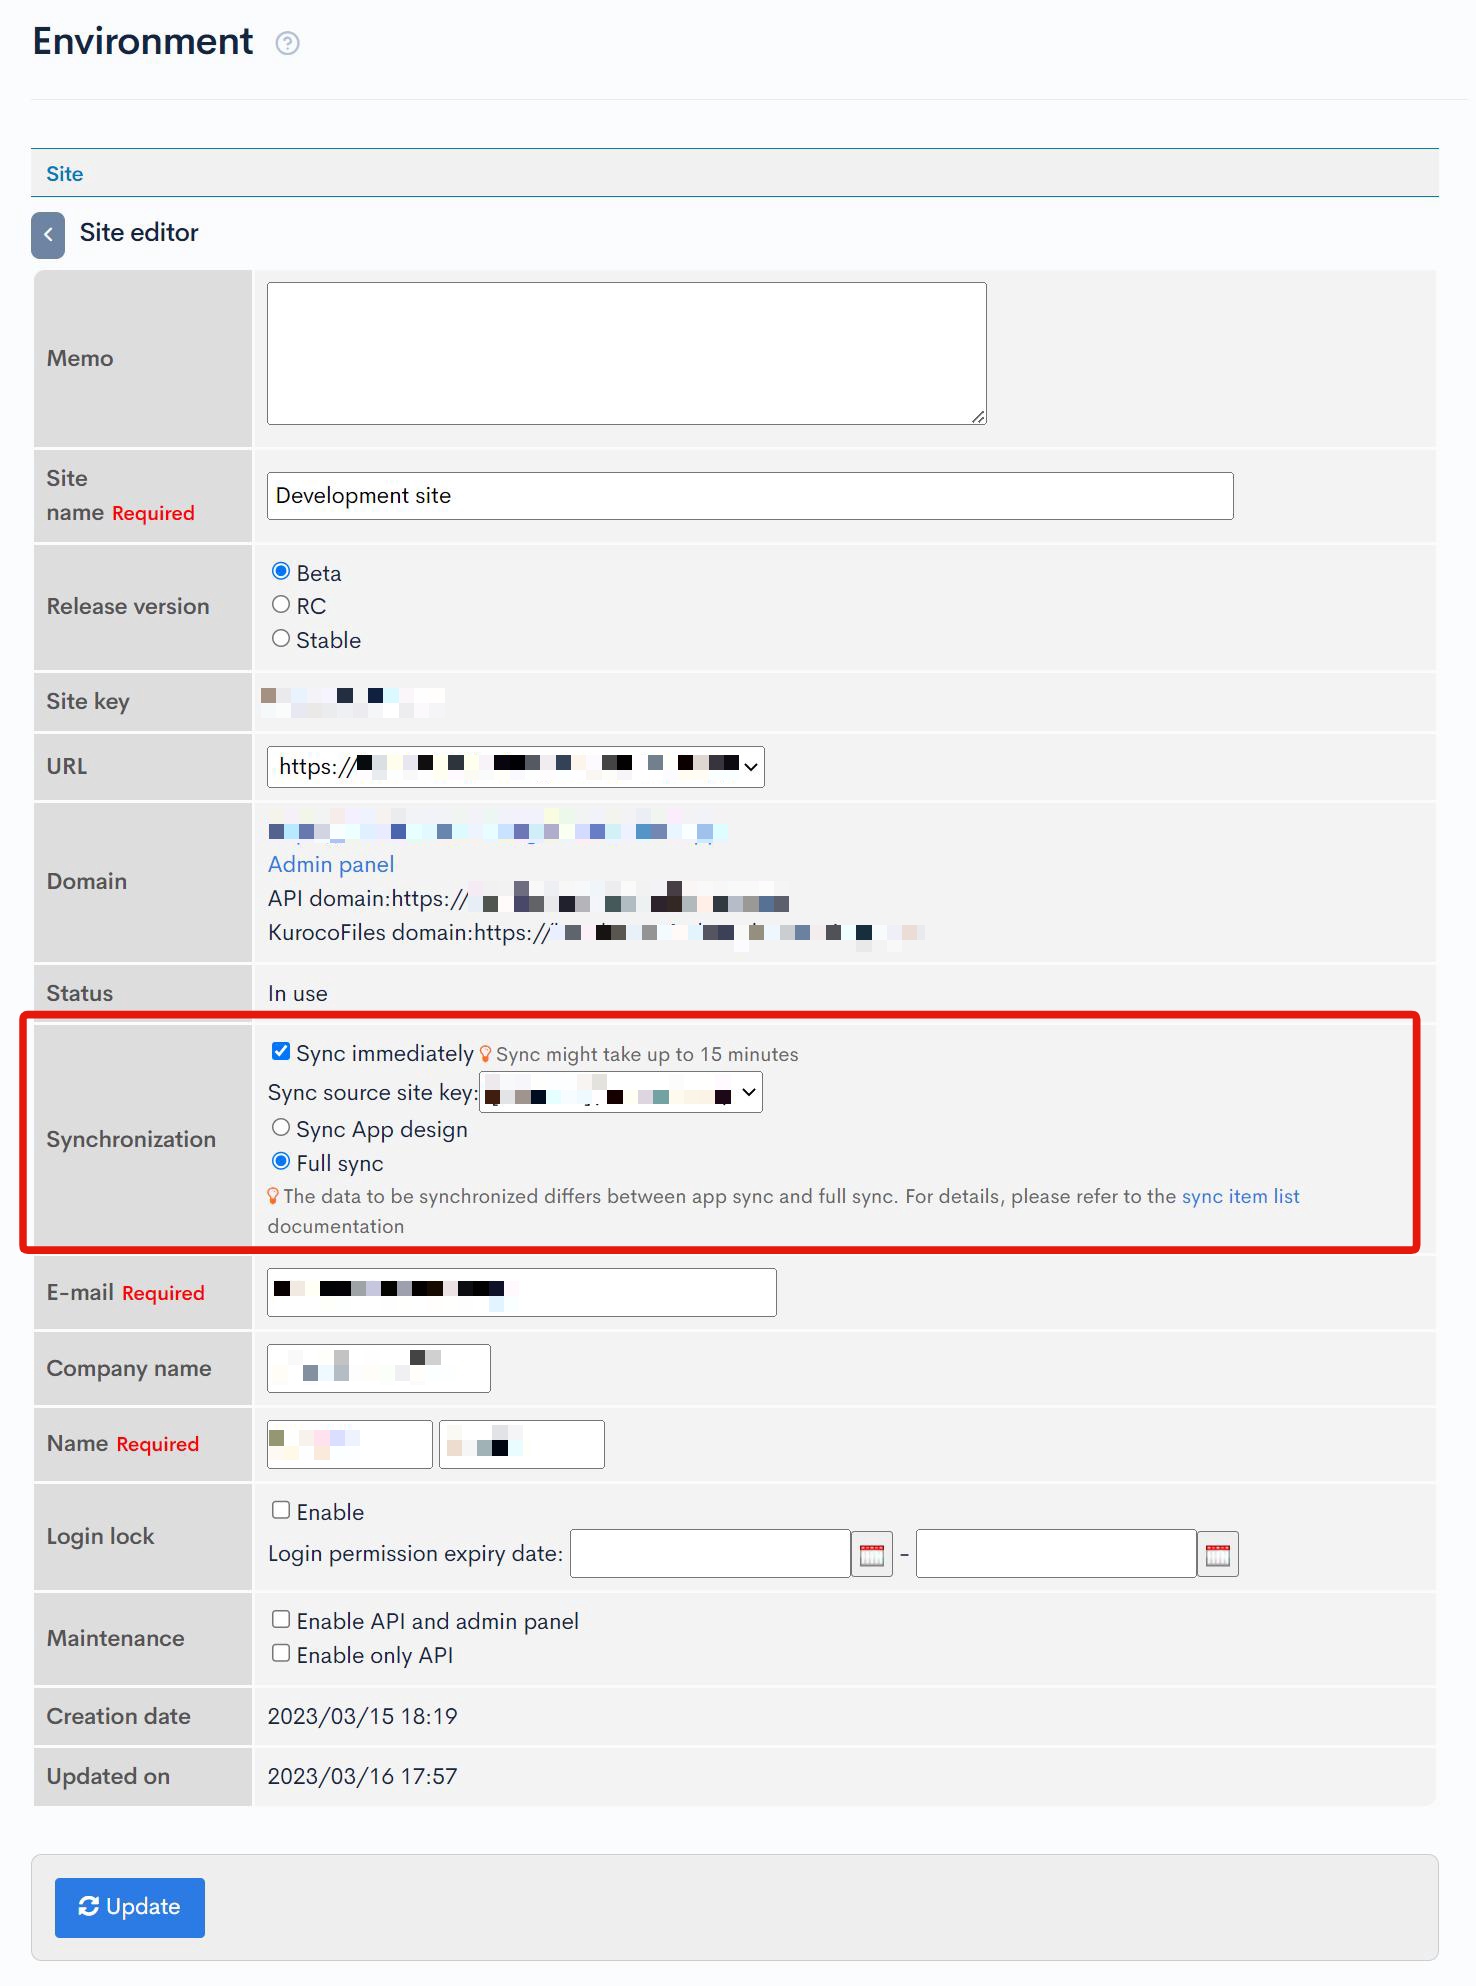
When "Updated." is displayed, synchronization is complete.
If you synchronize in the wrong direction, all necessary data will be overwritten. Therefore, we recommend that you back up your data as needed.
Checking the File Structure
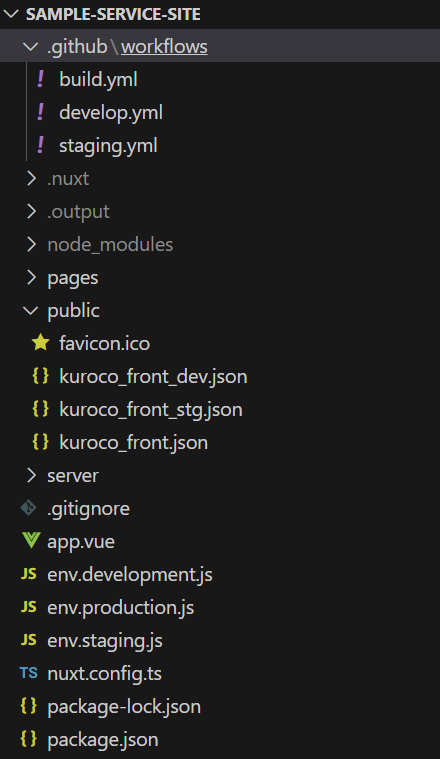
Once the preparation for using the development environment is complete, the following files should exist in any branch. If it's not working properly, please check if the file structure is correct.
.github\workflows
  - build.yml
  - develop.yml
  - staging.yml
public
  - kuroco_front_dev.json
  - kuroco_front_stg.json
  - kuroco_front.json
env.production.js
env.staging.js
env.development.js
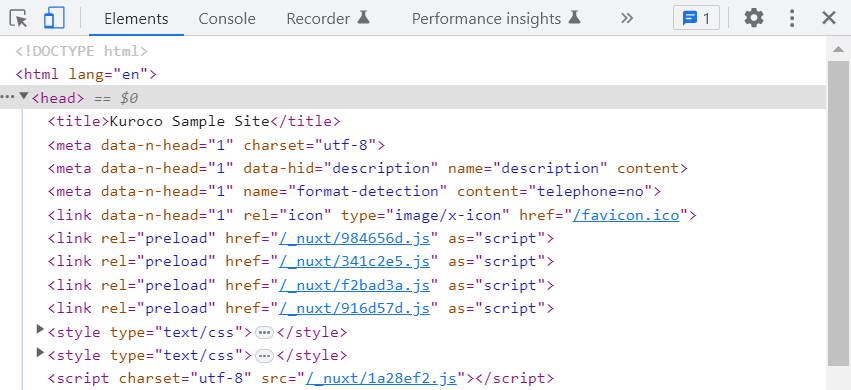
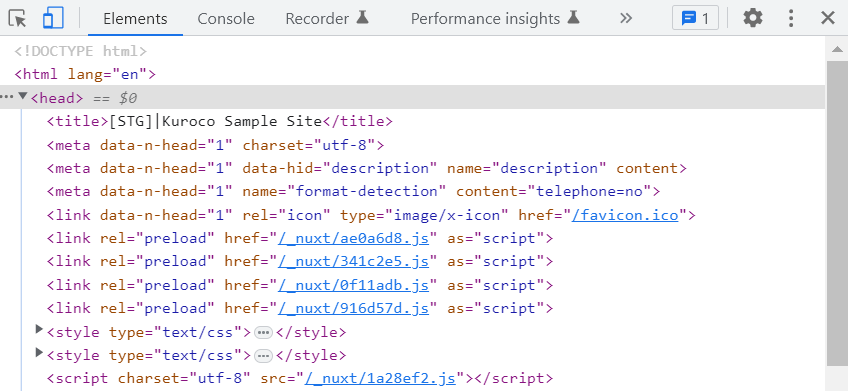
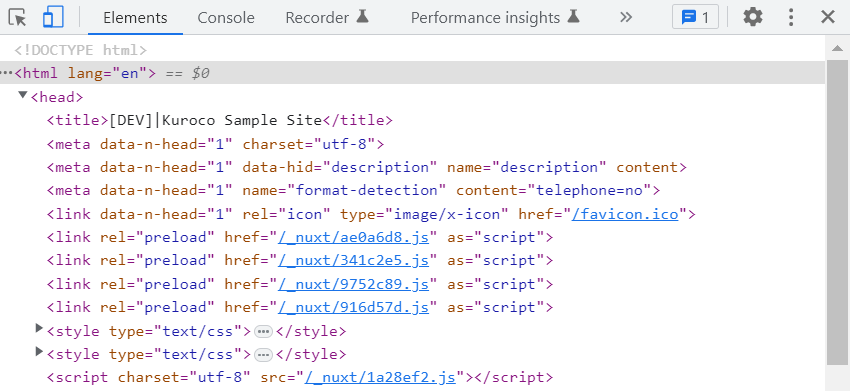
If the configuration is set correctly, you should see the site title corresponding to each environment when you check the display of each environment, as shown below.
- Production
- Staging
- Development
Related Documents
Support
If you have any other questions, please contact us or check out Our Slack Community.