ログイン画面を構築する
Kurocoを利用したNuxt.jsプロジェクトで、ログイン画面の作成方法を紹介します。
今回は例として、下記流れにてログインユーザーのみコンテンツ一覧ページが閲覧できる処理を実装します。
- API・エンドポイントの作成
- ログインフォーム実装
- ログイン処理実装(APIセキュリティ毎)
本チュートリアルでは以下のバージョンでコードを書いています。
Nuxt3: v3.8.0
前提条件
Nuxt.jsプロジェクトの作成について
このページはKurocoとNuxt.jsでのプロジェクトが構築済みであり、コンテンツ一覧のページが作成されていることを前提としています。 まだ構築していない場合は、下記のチュートリアルを参照してください。
Kurocoビギナーズガイド
KurocoとNuxt.jsで、コンテンツ一覧ページを作成する
APIセキュリティについて
Kurocoでは、APIのセキュリティ方法がいくつか用意されています。
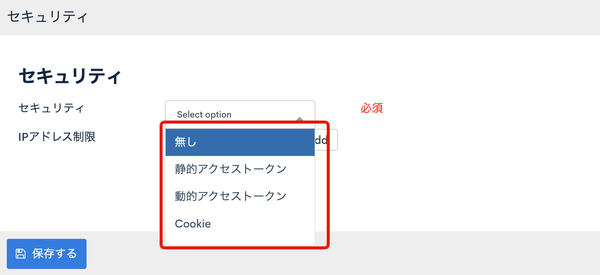 セキュリティ「無し」を選択されている場合には、ログインの必要無くAPIからデータを取得できますが、
何らかのセキュリティを設定している場合、利用者にはフロントエンドのログインフォームから認証/認可をしていただく必要があります。
セキュリティ「無し」を選択されている場合には、ログインの必要無くAPIからデータを取得できますが、
何らかのセキュリティを設定している場合、利用者にはフロントエンドのログインフォームから認証/認可をしていただく必要があります。
今回は、代表的なログイン方式として、以下の2つのパターンを例にしてフロントエンドのログインフォームを構築します。
- Cookie
- 動的アクセストークン
セキュリティの種類については、管理画面マニュアル -> API Securityを参照してください。
セキュリティの種類の詳細な確認方法は、Swagger UIを利用して、APIのセキュリティを確認するをご確認ください。
推奨ブラウザについて
本チュートリアルは、動作確認のためGoogle Chromeの開発者ツールを利用しています。 そのため、ブラウザはGoogle Chromeを推奨いたします。
APIの設定
ログイン用のAPIを設定します。
APIの作成
まずはAPIを新規で作成します。
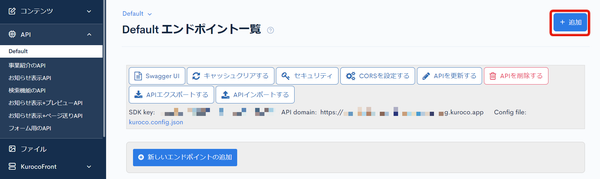
Kuroco管理画面のAPIより「追加」をクリックします。
API作成画面が表示されるので、下記入力し「追加する」をクリックします。
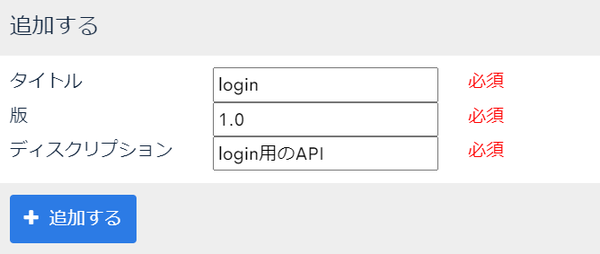
| 項目 | 設定内容 |
|---|---|
| タイトル | login |
| 版 | 1.0 |
| ディスクリプション | login用のAPI |
APIが作成されました。
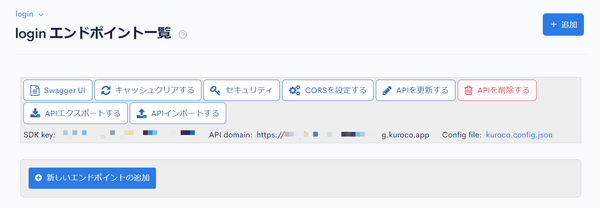
エンドポイントの作成
次にエンドポイントを作成します。今回は下記エンドポイントを作成します。
- loginエンドポイント
- profileエンドポイント
- logoutエンドポイント
- tokenエンドポイント(APIセキュリティが動的アクセストークンの場合のみ)
「新しいエンドポイントの追加」をクリックし、それぞれ作成します。
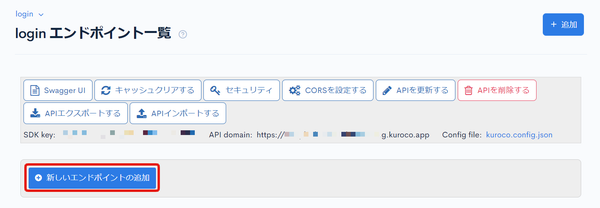
loginエンドポイントの作成
loginエンドポイントを下記設定にて作成します。
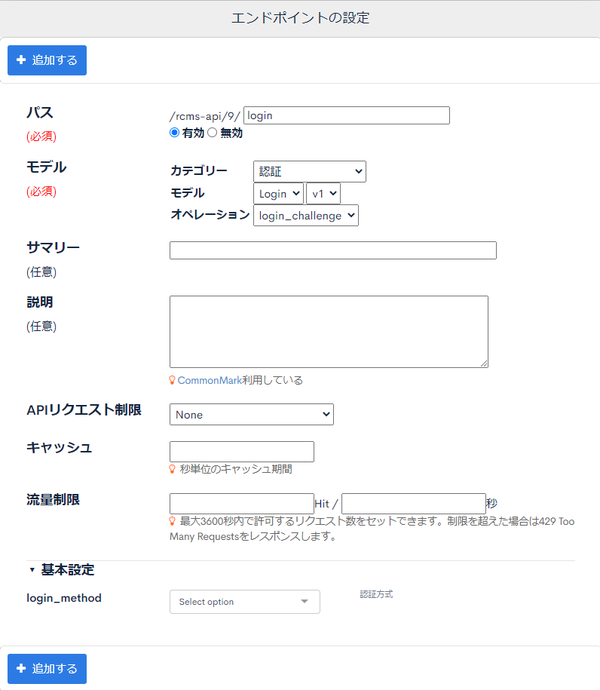
| 項目 | 設定内容 |
|---|---|
| パス | login |
| カテゴリー | 認証 |
| モデル | login v1 |
| オペレーション | login_challenge |
設定完了後、「追加する」をクリックしloginエンドポイント完成です。
profileエンドポイントの作成
profileエンドポイントを下記設定にて作成します。
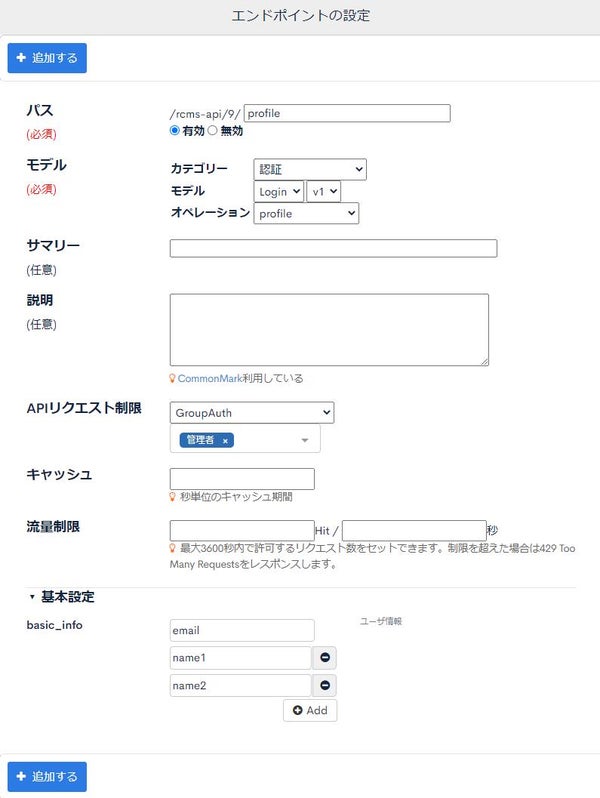
| 項目 | 設定内容 |
|---|---|
| パス | profile |
| カテゴリー | 認証 |
| モデル | login v1 |
| オペレーション | profile |
| APIリクエスト制限 | GroupAuth:所属しているグループ ログインを許可するグループを選択してください。 |
| 基本設定:basic_info |
|
設定完了後、「追加する」をクリックしエンドポイント完成です。
profileエンドポイントは、アクセスしているユーザーの情報を(簡易的に)返却するものです。
GroupAuthでの認証を設定しているため、ログイン済みで無い場合は情報を返さずにエラーとなります。
今回の場合は、email,name1,name2を値を返すように設定しており、簡易的なユーザー情報を取得するほかに、ログイン状態のリストアをする際、操作しているユーザーが本当にログイン済みであるのかを検証するためにリクエストします。
logoutエンドポイントの作成
logoutエンドポイントを下記設定にて作成します。
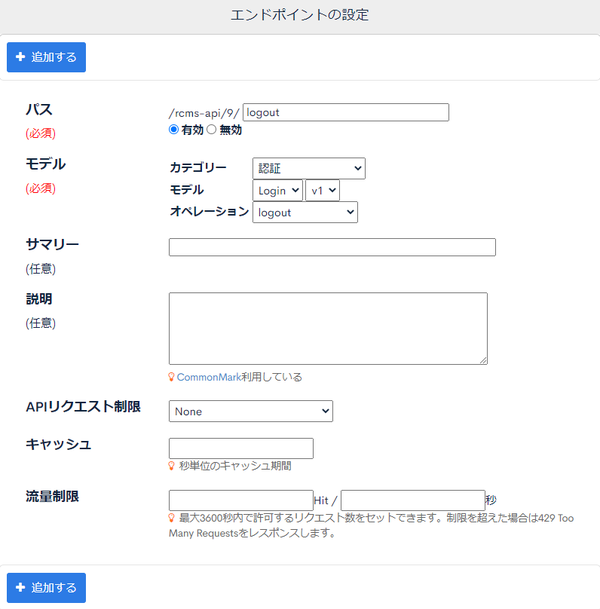
| 項目 | 設定内容 |
|---|---|
| パス | logout |
| カテゴリー | 認証 |
| モデル | login v1 |
| オペレーション | logout |
| APIリクエスト制限 | None |
設定完了後、「追加する」をクリックしエンドポイント完成です。
tokenエンドポイントの作成
tokenエンドポイントを下記設定にて作成します。
tokenエンドポイントは、APIセキュリティが動的アクセストークンの場合のみ必要になります。 APIセキュリティがCookieの場合、作成する必要はありません。
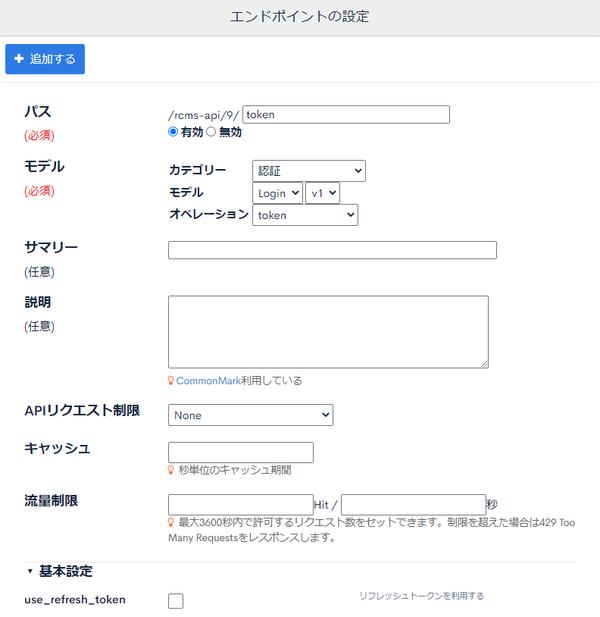
| 項目 | 設定内容 |
|---|---|
| パス | token |
| カテゴリー | 認証 |
| モデル | login v1 |
| オペレーション | token |
| APIリクエスト制限 | None |
設定完了後、「追加する」をクリックしエンドポイント完成です。
CORSの設定
次にCORSの設定をします。[CORSを設定する] をクリックします。
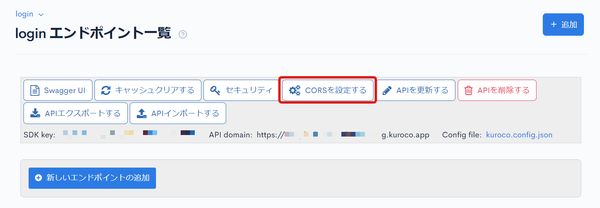
CORS_ALLOW_ORIGINSの [Add Origin] をクリックし、下記を追加します。
http://localhost:3000/- フロントエンドドメイン
CORS_ALLOW_METHODSの [Add Method] をクリックし、下記を追加します。
- GET
- POST
- OPTIONS
CORS_ALLOW_CREDENTIALSの[Allow Credentials]にチェックが入っていることを確認します。
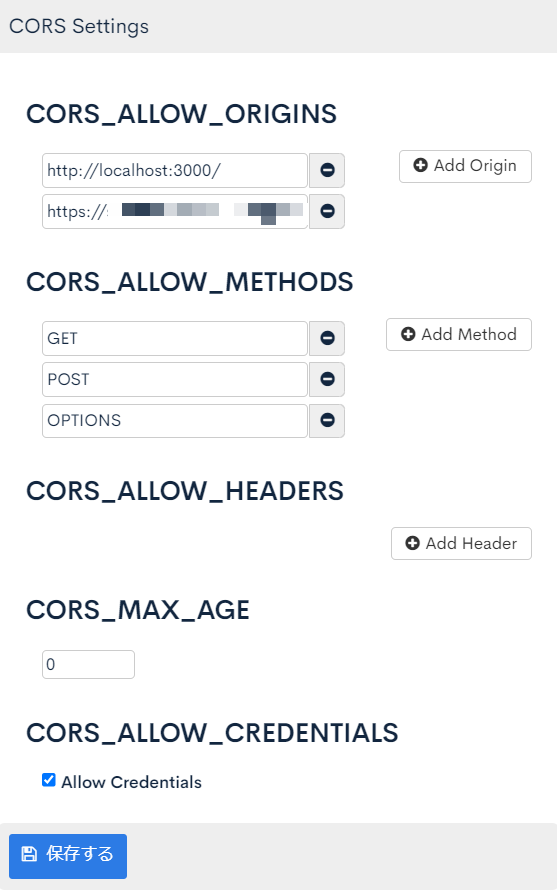
問題なければ [保存する] をクリックします。
以上で、APIの設定が完了です。
ログインフォーム実装
次に、フロントエンドにログインフォームを作成します。
ダミーのログインフォーム実装
まずはAPIとの連携は省いた状態でログイン画面用コンポーネントの作成し、ダミーでのログイン連携処理を実装していきます。
また、お知らせ一覧画面ではログイン済みかどうかのフラグを参照し、ログイン済みでなければログイン画面に画面遷移するように変更します。
まず、ログイン画面用コンポーネントを作成します。
pages/login/index.vue ファイルを新規作成し、以下を記載してください。
<template>
  <form @submit.prevent="login">
    <input v-model="email" name="email" type="email" placeholder="email" />
    <input
      v-model="password"
      name="password"
      type="password"
      placeholder="password" />
    <button type="submit">Login</button>
  </form>
</template>

<script setup>
  const config = useRuntimeConfig();

  const email = ref('');
  const password = ref('');

  function login() {
    console.log(email.value, password.value);
  }
</script>
この状態でnpm run devを実行し、http://localhost:3000/loginにアクセスすると簡単なログインフォームが表示されます。
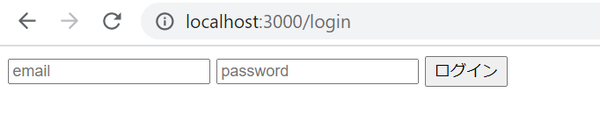
ここまでで、一度ログの確認をします。
Chromeの開発者ツール:コンソールを開いた状態でフォームに下記を入力し、[ログイン]をクリックします。
- email:
test@example.com - password:password
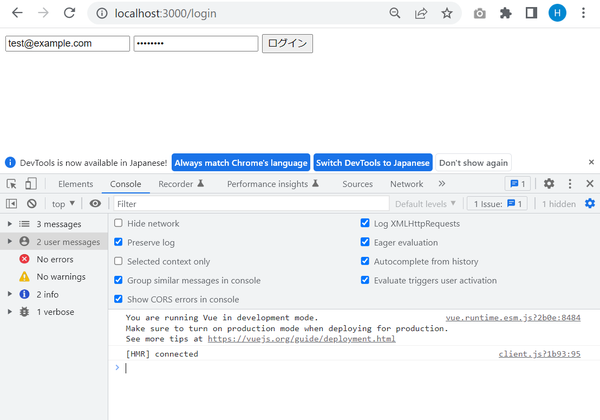
すると、入力したemailとpasswordがログとしてコンソールに表示されます。
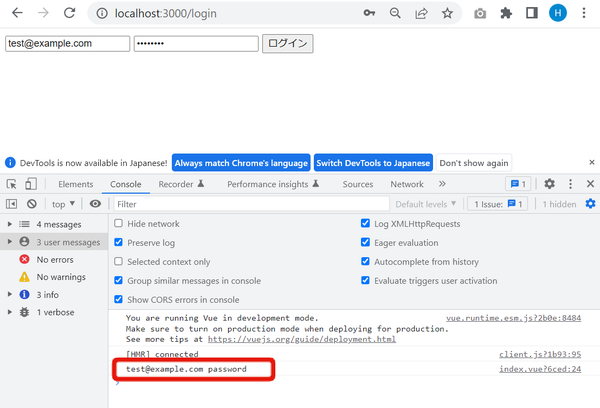
このログに出力された値をログイン用APIに実際にリクエストすることになります。ひとまずAPI連携部分は仮で実装をし、ログイン後の動きを確認します。
1秒間のリクエストをする見せかけのダミー処理を追加作成し、ログインリクエストに成功した場合、画面上で"ログイン成功"と表示されるように、下記のように修正します。
<template>
  <form @submit.prevent="login">
+    <p v-if="loginStatus !== null" :style="{ color: resultMessageColor }">
+      {{ resultMessage }}
+    </p>
+
    <input v-model="email" name="email" type="email" placeholder="email" />
    <input
      v-model="password"
      name="password"
      type="password"
      placeholder="password"
    />
    <button type="submit">Login</button>
  </form>
</template>

<script setup>
const config = useRuntimeConfig();

const email = ref("");
const password = ref("");
+const loginStatus = ref(null);
+const resultMessage = ref(null);

+let resultMessageColor = computed(() => {
+  switch (loginStatus.value) {
+    case "success":
+      return "green";
+    case "failure":
+      return "red";
+    default:
+      return "";
+  }
+});
+
-function login() {
-    console.log(email.value, password.value)
+async function login() {
+  // Dummy request(Succeed/fail after 1 sec.)
+  const shouldSuccess = true
+  const request = new Promise((resolve, reject) =>
+      setTimeout(
+          () => (shouldSuccess ? resolve() : reject(Error('login failure'))),
+          1000
+      )
+  )
+  try {
+      await request
+      loginStatus.value = 'success'
+      resultMessage.value = 'Login successful'
+  } catch (e) {
+      loginStatus.value = 'failure'
+      resultMessage.value = 'Login failed'
+  }
}
</script>
1秒の待機の後、[ログインに成功しました]が表示されます。
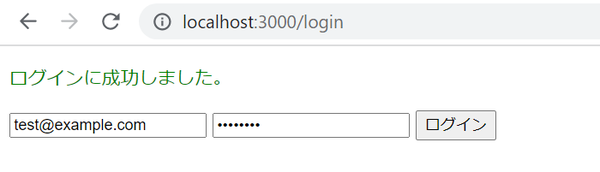
失敗した際にどうなるかを確認します。
ソースコードから、shouldSuccess = trueを shouldSuccess = falseへ変更し、レスポンスがエラーとなる場合を再現確認します。
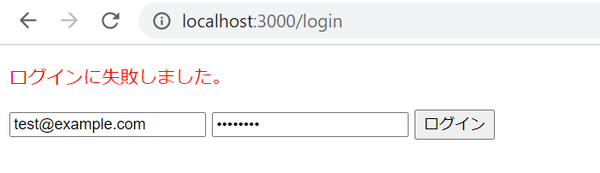
確認後は、shouldSuccess = trueへ戻してください。
ログイン状態の保持
次にログイン状態を保持できるように実装します。
準備
ログイン関連の処理を保持するストアを作成するには、Piniaパッケージをインストールする必要があります。
次のコマンドを使用して Pinia をインストールします:
npx nuxi@latest module add pinia
このコマンドは、@pinia/nuxt と pinia の両方をプロジェクトに追加します。
もし pinia がインストールされていない場合は、次のように手動でインストールしてください:
npm を使用している場合、依存関係ツリーの解決ができない ERESOLVE エラーが発生することがあります。
その場合は、package.json に以下を追加してください:
"overrides": {
  "vue": "latest"
}
次に、nuxt.config.js ファイルの modules に追加します。
// nuxt.config.js
export default defineNuxtConfig({
  // ... other options
  modules: [
    // ...
    '@pinia/nuxt',
  ],
})
さらに、plugins/pinia.js ファイルを作成してください。
import { createPinia } from 'pinia';
export default defineNuxtPlugin((nuxtApp) => {
  const pinia = createPinia();
  nuxtApp.vueApp.use(pinia);
});
a. storeの作成
まずはログイン状態をWebアプリ全体で保持しておき、他の画面でも参照できるようstoreを作成します。
stores/authentication.jsファイルを新規作成し、下記のコードを記載してください。
import {defineStore} from 'pinia';

export const useStore = defineStore('authentication', {
  state: () => ({
    profile: null,
  }),
  actions: {
    setProfile(profile) {
      this.profile = profile;
    },
  },
  getters: {
    authenticated: (state) => state.profile !== null,
  },
});
gettersのauthenticatedは、後ほど作成していくprofileデータが空かどうかでtrue/falseが返却されるものです。
profileデータが空で無ければログイン状態と判定する想定をしています。
後にログインした時やログイン状態のリストア時にprofileデータを自動取得し、それ以外のログアウトなどで値が設定されないようにしていきます。
b. middlewareの作成
次にmiddlewareを作成します。
middleware/auth.jsを新規作成し、下記のコードを記載してください。
import { useStore } from '~/stores/authentication';

export default defineNuxtRouteMiddleware((to) => {
  const store = useStore();

  // Define public paths that don't require authentication (add any login pages that don't require authentication)
  const publicPaths = ['/login'];

  // Allow access if the current path is public
  if (publicPaths.some(path => to.path.startsWith(path))) {
    return;
  }

  if (!store.authenticated) {
    return navigateTo('/login');
  }
});
middlewareは各画面のソースpage/*.vueが処理をする以前に動作します。
storeのauthenticatedがfalseである場合にはログインページへ強制的にリダイレクトさせます。
c. middlewareの動作確認
middlewareの動作を確認します。
pages/login/index.vueにニュース一覧ページへのリンクを追加します。
         <button type="submit">
             Login
         </button>
+
+        <div>
+            <nuxt-link to="/news">
+                news list
+            </nuxt-link>
+        </div>
     </form>
 </template>
ニュース一覧画面のpages/news/index.vueのソースコードを変更して、middlewareを適用します。
<script setup>
+  definePageMeta({
+    middleware: ["auth"],
+  });
...
この処理により、ニュース一覧画面にアクセスするためにはログインが必要になります。 ログインしていない場合は、ニュース一覧ページへアクセスすると強制的にログイン画面へとリダイレクトされるようになります。
次に、ログイン成功時、storeのprfofileをnull以外の状態へ変更するようにします。
pages/login/index.vueを下記のように変更します。
<script setup>
+import { useStore } from "~/stores/authentication";
+const store = useStore();

...
             try {
                 await request
+                store.setProfile({}); // Apply the dummy object to store.state.profile
+
                 loginStatus.value = 'success'
                 resultMessage.value = 'Login successful'
             } catch (e) {
ログインページにアクセスし、ログイン操作をしてニュース一覧ページに画面遷移することを確認します。
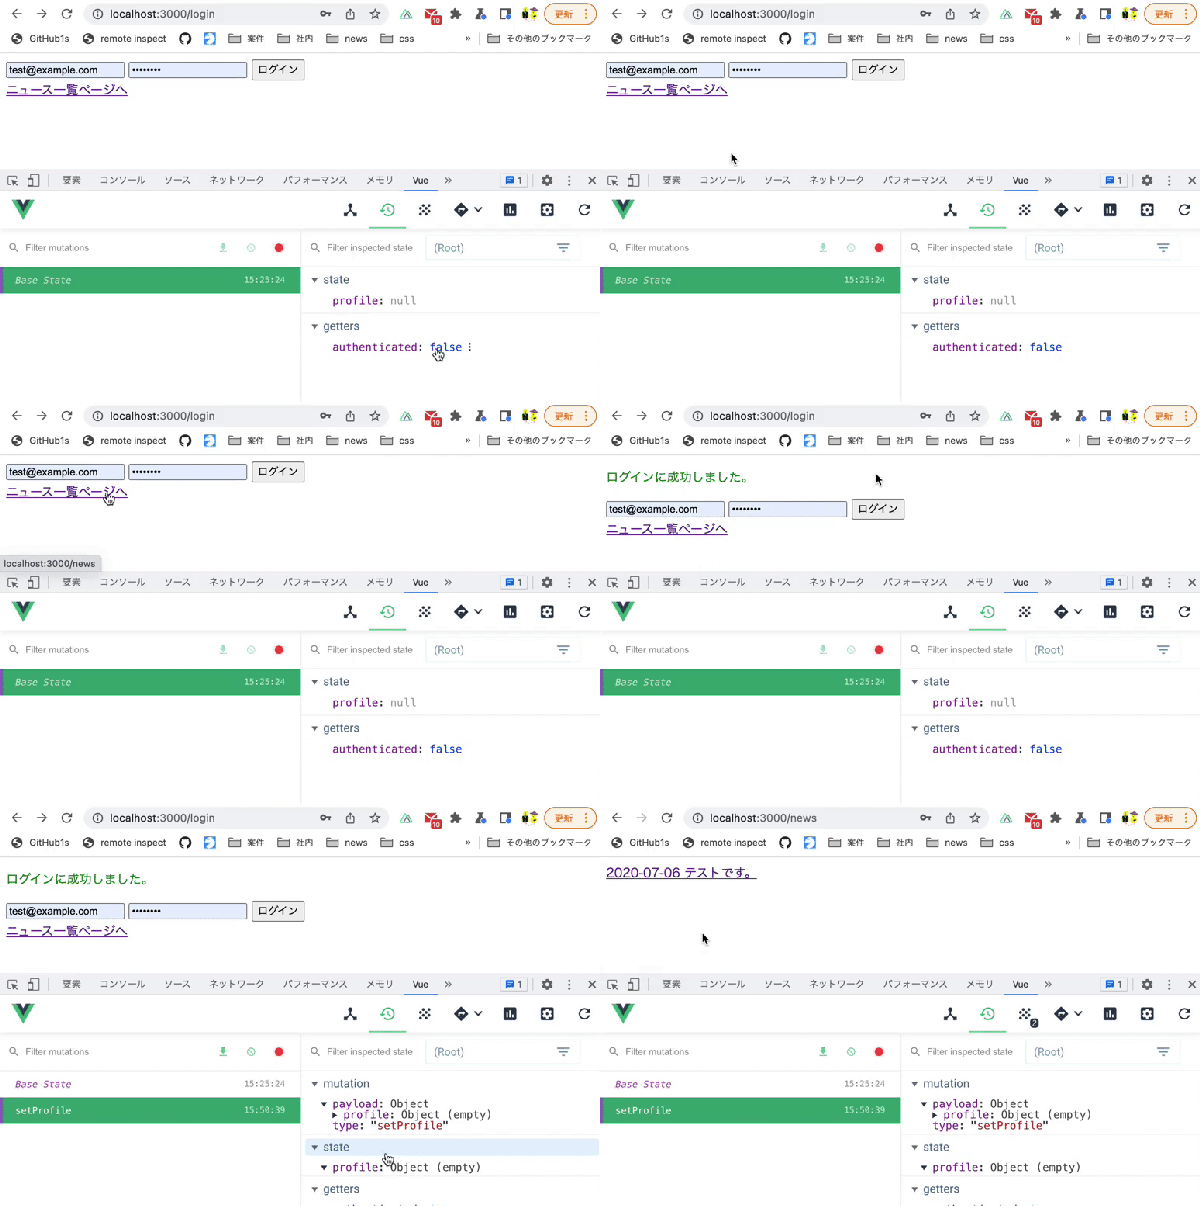
確認にはVue.js devtoolsを使用しています。
ログイン状態のリストアの実装
これまでの実装によって通常のログイン処理は実装されました。 しかしながら、直接URLアクセスやブラウザで画面更新されたとき、これまでの実装では一度ログインしたはずであるのにも関わらずログイン画面にリダイレクトされる不具合が発生します。
上記の操作では、storeのprofileはNuxtが初期化されるためnullとなり、
直前に一度ログインしていた場合であってもログイン状態と判定されないためです。
この対応には、一度ログインしたことがある場合にはブラウザのLocalStorageにフラグを設定しておき、
フラグがtrueである場合にstoreのprofileにダミーのデータを適用するようにします。
/stores/authentication.jsを下記のように修正してください。
    setProfile(profile) {
        this.profile = profile
    },
+    async restoreLoginState() {
+      const authenticated = localStorage.getItem("authenticated");
+      const isAuthenticated = authenticated ? JSON.parse(authenticated) : false;
+
+      if (!isAuthenticated) {
+        throw new Error("need to login");
+      }
+      try {
+        this.setProfile({}); // Store the dummy object.
+      } catch {
+        throw new Error("need to login");
+      }
+    },
   },
   getters: {
     authenticated: (state) => state.profile !== null,
また、/middleware/auth.jsを下記のように修正してください。
 import { useStore } from '~/stores/authentication';

-export default defineNuxtRouteMiddleware((to) => {
+export default defineNuxtRouteMiddleware(async (to, from) => {
   const store = useStore();

   // Define public paths that don't require authentication (add any login pages that don't require authentication)
   const publicPaths = ['/login'];

   // Allow access if the current path is public
   if (publicPaths.some(path => to.path.startsWith(path))) {
     return;
   }

   if (!store.authenticated) {
-    return navigateTo('/login');
+    try {
+      await store.restoreLoginState();
+    } catch (err) {
+      return navigateTo('/login');
+    }
   }
 });
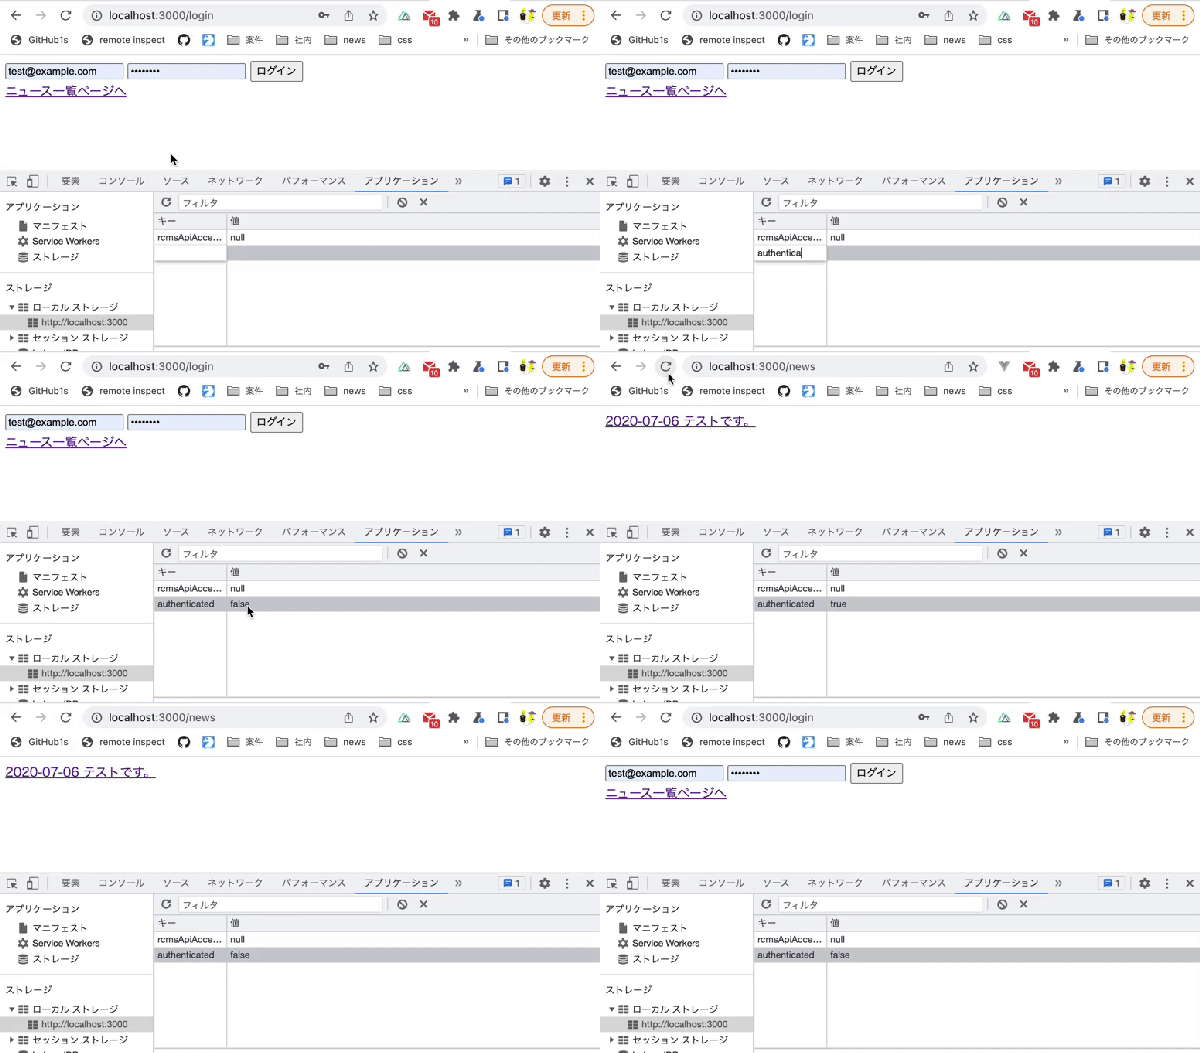
ニュース一覧ページにアクセスし、下記4点を確認します。
- LocalStorageの
authenticatedがtrue以外である場合、ログインページにリダイレクトされること - LocalStorageの
authenticatedがtrueである場合、ログインページにリダイレクトされないこと - LocalStorageの
authenticatedがtrueかつブラウザの画面更新をした場合でも、ログインページにリダイレクトされないこと - LocalStorageの
authenticatedをfalseにしてブラウザの画面更新をすると、ログインページにリダイレクトされること
今回はLocalStorageの状態を、chromeの開発者ツールの[Application]タブにて確認します。
chromeの開発者ツールより[Application]タブをクリックし、[Storage] -> [Local Storage] -> [http://localhost:3000]をクリックします。
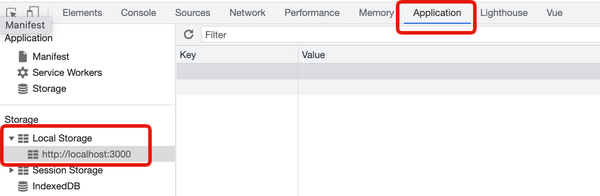 ログインページよりログイン後、Keyに
authenticated、Valueにtrueまたはfalseを入力し、上記4点の動作を確認します。
ログイン動作修正
次にログイン動作を修正します。
ログイン成功時にLocalStorageのauthenticatedをtrueにさせます。また、今後の修正に備えてログイン処理を一部storeに移動します。
/pages/login/index.vueを下記のように修正します。
 async function login () {
-    // Dummy request(Succeed/fail after 1 sec.)
-    const shouldSuccess = true
-    const request = new Promise((resolve, reject) =>
-        setTimeout(
-            () => (shouldSuccess ? resolve() : reject(Error('login failure'))),
-            1000
-        )
-    )
-
     try {
-        await request
-        store.setProfile({}) // Apply the dummy object to store.state.profile
+        const payload = {
+            email: email.value,
+            password: password.value
+        }
+        await store.login(payload)

         loginStatus.value = 'success'
         resultMessage.value = 'Login Successful'
次に/stores/authentication.jsを下記のように修正します。
...
  actions: {
     setProfile (profile) {
         this.profile = profile
     },
+    updateLocalStorage(payload) {
+      Object.entries(payload).forEach(([key, val]) => {
+        if (val === null || val === false) {
+          localStorage.removeItem(key);
+        } else {
+          localStorage.setItem(key, JSON.stringify(val));
+        }
+      });
+    },
+    async login (payload) {
+        // dummy request(succeed/fail after 1 sec.)
+        const shouldSuccess = true
+        const request = new Promise((resolve, reject) =>
+            setTimeout(
+                () => (shouldSuccess ? resolve() : reject(Error('login failure'))),
+                1000
+            )
+        )
+        await request
+
+        this.setProfile({}) // Apply the dummy object to store.state.profile
+        this.updateLocalStorage({ authenticated: true })
+    },
     async restoreLoginState () {
         const authenticated = JSON.parse(localStorage.getItem('authenticated'))
ログイン成功時にauthenticatedがtrueになることを確認します。
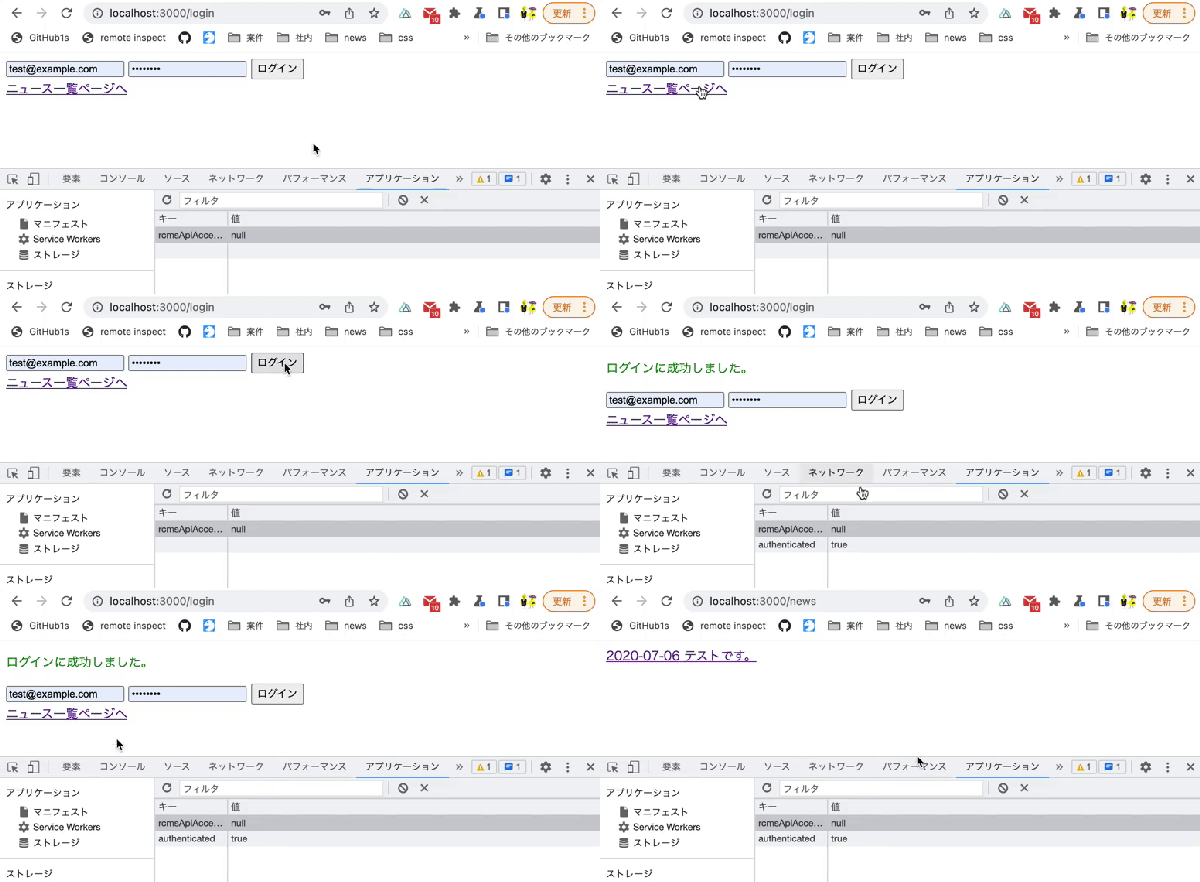 以上でフロントエンドの実装を終了します。
次にAPIを実装します。 なお、実装はAPIセキュリティ毎に実装方法が変わります。 今回はAPIセキュリティがCookieの場合と、動的アクセストークンの場合の実装方法を記載します。 ご自身のAPIセキュリティに併せて、それぞれの対応方法をご確認ください。
A. ログイン処理実装(APIセキュリティがCookieの場合)
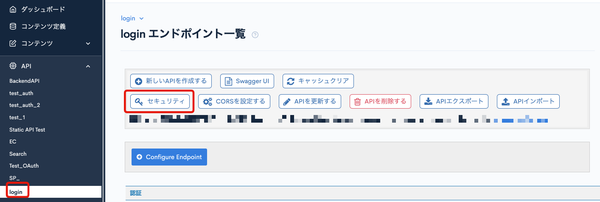
次に、先ほどダミーで作成していたログイン処理をloginエンドポイントへとアクセスするように変更します。 まずはAPIセキュリティがCookieの場合の実装方法を説明します。 Kuroco管理画面より、[API] -> [login] をクリックし、「セキュリティ」をクリックしてください。
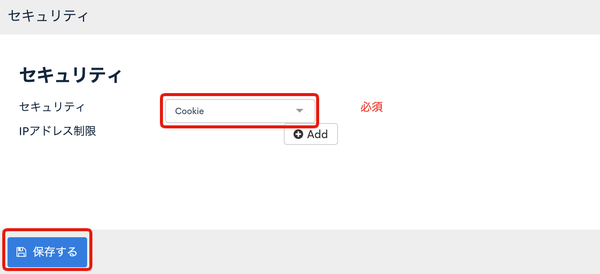
 「セキュリティ」よりCookieを選択し、「保存する」をクリックしてください。
loginエンドポイントへのリクエスト実装
stores/authentication.jsを下記に修正します。
...
     async login(payload) {
-      // dummy request(succeed/fail after 1 sec.)
-      const shouldSuccess = true;
-      const request = new Promise((resolve, reject) =>
-        setTimeout(
-          () => (shouldSuccess ? resolve() : reject(Error("login failure"))),
-          1000
-        )
-      );
-      await request;
+      await $fetch("/rcms-api/1/login", {
+        method: "POST",
+        body: JSON.stringify(payload),
+        baseURL: useRuntimeConfig().public.apiBase,
+        credentials: "include",
+      });

       this.setProfile({}); // Apply the dummy object to store.state.profile
       this.updateLocalStorage({ authenticated: true})
次に、loginエンドポイントへリクエストされているか確認します。
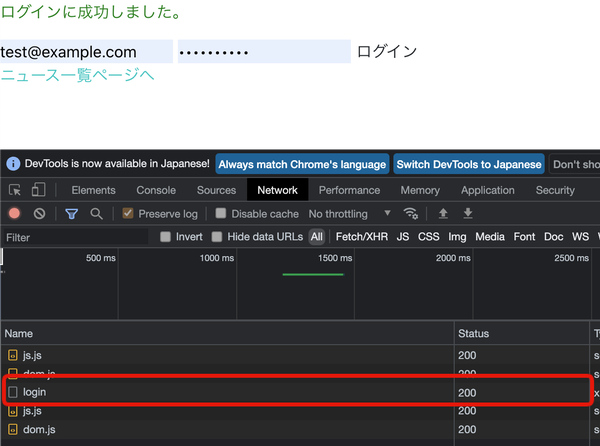
ログインページを開き、Chromeの開発者ツール:ネットワークを開いた状態でログイン処理を行います。 すると、loginエンドポイントへとリクエストされていることが確認できます。
profileエンドポイントへのリクエスト/ハンドリング実装
今までの実装では、ブラウザのLocalStorageのauthenticatedフラグによってログイン済かどうかを判断する実装をしています。
しかしながら、LocalStorageはブラウザ上で簡単に改ざんが可能です。
またセッション有効期限によってauthenticatedがtrueであっても、実際には他のエンドポイントへのリクエストがアクセスエラーとなる場合もあります。
これらによる誤動作を防ぐため、profileのAPIにリクエストし、ユーザー情報が返ってくるか否かを確認することで二重のチェックを行います。
二重のチェックは、profileエンドポイントである必要はありませんが、ログイン中のユーザー名を表示する等、profileが返すデータを最初に必要とするユースケースが多いため、profileエンドポイントの利用が、スタンダードになっています。
/stores/authentication.jsを下記のように修正します。
...
 actions: {
   async login(payload) {
      await $fetch("/rcms-api/1/login", {
        method: "POST",
        body: JSON.stringify(payload),
        baseURL: useRuntimeConfig().public.apiBase,
        credentials: "include",
      });
-    this.setProfile({}) // store a dummy object.
+    const profileRes = await $fetch("/rcms-api/1/profile", {
+        baseURL: useRuntimeConfig().public.apiBase,
+        credentials: "include",
+      });
+    this.setProfile(profileRes)
     this.updateLocalStorage({ authenticated: true })
   },
   async restoreLoginState() {
     const authenticated = JSON.parse(localStorage.getItem("authenticated"));

     if (!authenticated) {
       throw new Error('need to login')
     }
     try {
-      this.setProfile({}); // Store the dummy object.
+      const profileRes = await $fetch("/rcms-api/1/profile", {
+        baseURL: useRuntimeConfig().public.apiBase,
+        credentials: "include",
+      });
+      this.setProfile(profileRes);
     } catch {
       throw new Error("need to login");
     }
   },
  },
  getters: {
    authenticated: (state) => state.profile !== null,
  },
});
修正ができたらリストアの動作を確認します。
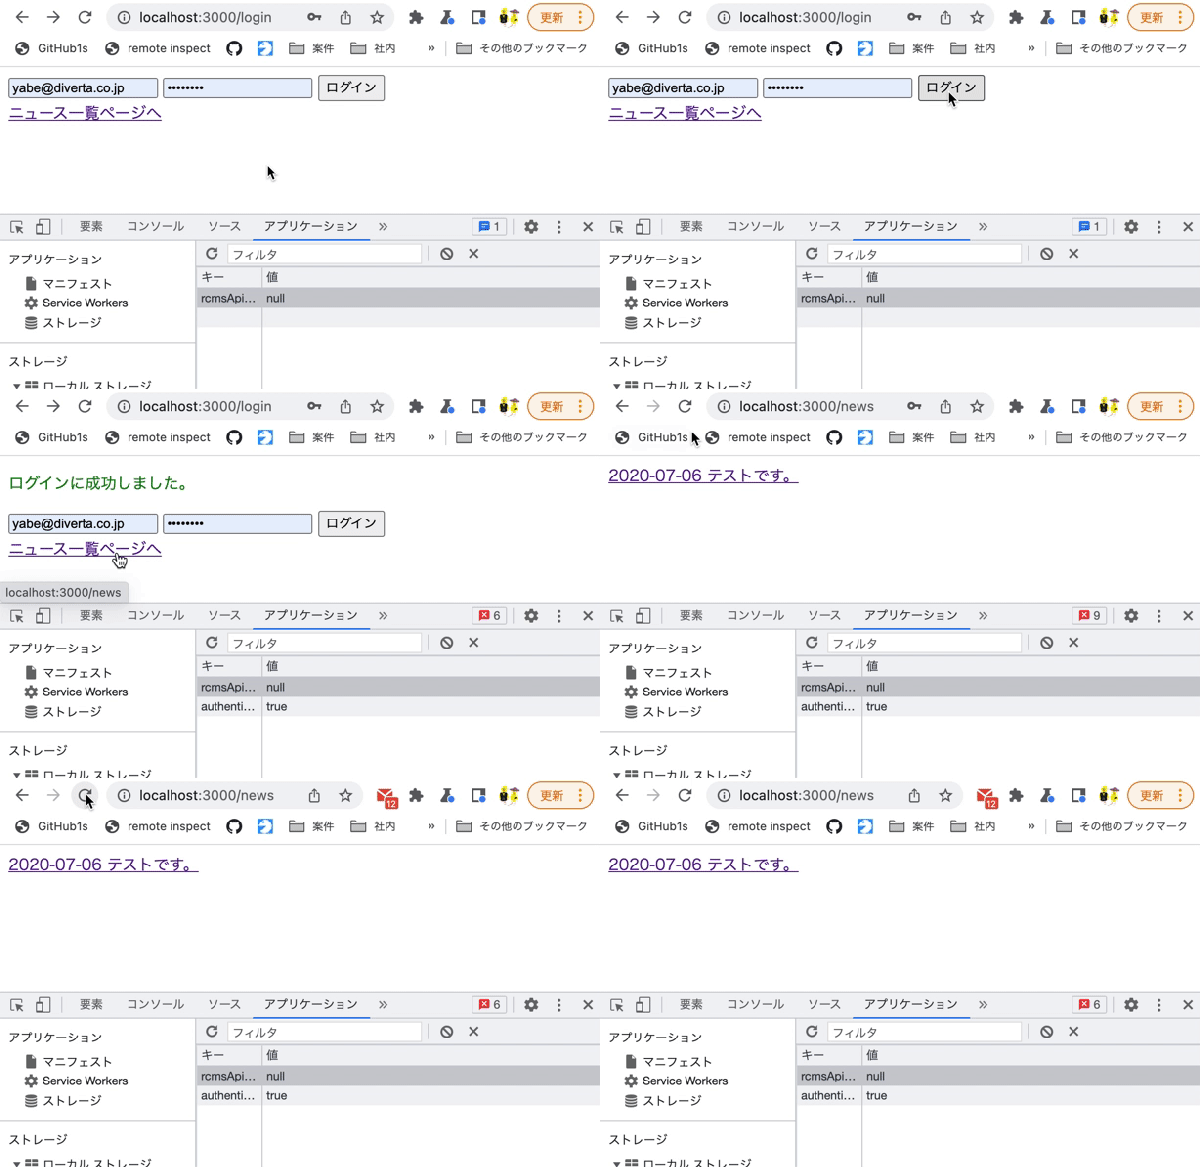
ログインページを開き、Chromeの開発者ツール:アプリケーションを開いた状態でログイン処理を行います。
すると、authenticatedがtrueとなります。
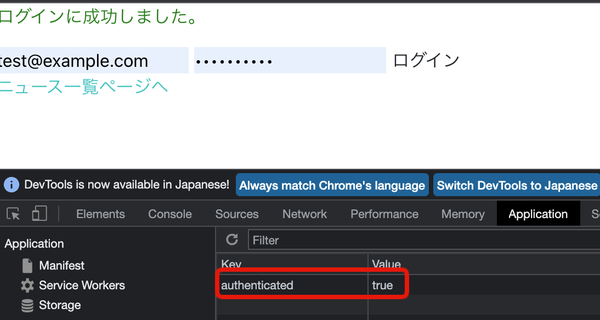 この状態で、「ニュース一覧ページへ」をクリックし画面遷移します。
今までの実装と同じように、authenticatedがtrueのまま、ニュース一覧ページの表示を確認できます。
logoutエンドポイントへのリクエスト/ハンドリング実装
次に、ログアウト処理を実装します。
Kuroco側でセッションが残っていながらフロント側で再ログインした場合など、予期せぬ動作が発生する可能性もあります。
そのため、ログイン状態ではないと判定する場合はAPIへログアウト状態にするようリクエストする必要があります。
/stores/authentication.jsを下記のように修正します。
...
-    async restoreLoginState () {
+    async logout() {
+      try {
+        await $fetch("/rcms-api/1/logout", {
+          method: "POST",
+          baseURL: useRuntimeConfig().public.apiBase,
+          credentials: "include",
+        });
+      } catch {
+        /** No Process */
+        /** When it returns errors, it consider that logout is complete and ignore this process. */
+      }
+      this.setProfile(null);
+      this.updateLocalStorage({ authenticated: false });
+
+      navigateTo("/login");
+    },
+    async restoreLoginState () {
         const authenticated = JSON.parse(localStorage.getItem('authenticated'))

         if (!authenticated) {
           throw new Error('need to login')
         }
         try {
         const profileRes = await $fetch("/rcms-api/1/profile", {
           baseURL: useRuntimeConfig().public.apiBase,
           credentials: "include",
         });
         this.setProfile(profileRes);
       } catch {
+        await this.logout();
         throw new Error("need to login");
       }
     },
   },
   getters: {
    authenticated: (state) => state.profile !== null,
  },
});
また、ニュース一覧画面を以下のように修正し、ログアウトボタンを作成します。
<template>
   <div>
+    <button type="button" @click="logout">Logout</button>
     <p>News list</p>
     <div v-for="n in response.list" :key="n.slug">
       <nuxt-link :to="`/news/${n.topics_id}`">
@@ -10,6 +11,7 @@
</template>

<script setup>
+import { useStore } from "~/stores/authentication";
 definePageMeta({
   middleware: ["auth"], // Use the 'auth' middleware defined in middleware/auth.ts
 });
 const config = useRuntimeConfig(); //please add this line if not added already
@@ -18,4 +20,6 @@ const { data: response } = await useFetch("/rcms-api/1/news", {
   baseURL: config.public.apiBase,
   credentials: "include",
 });
+const store = useStore();
+const logout = () => store.logout();
</script>
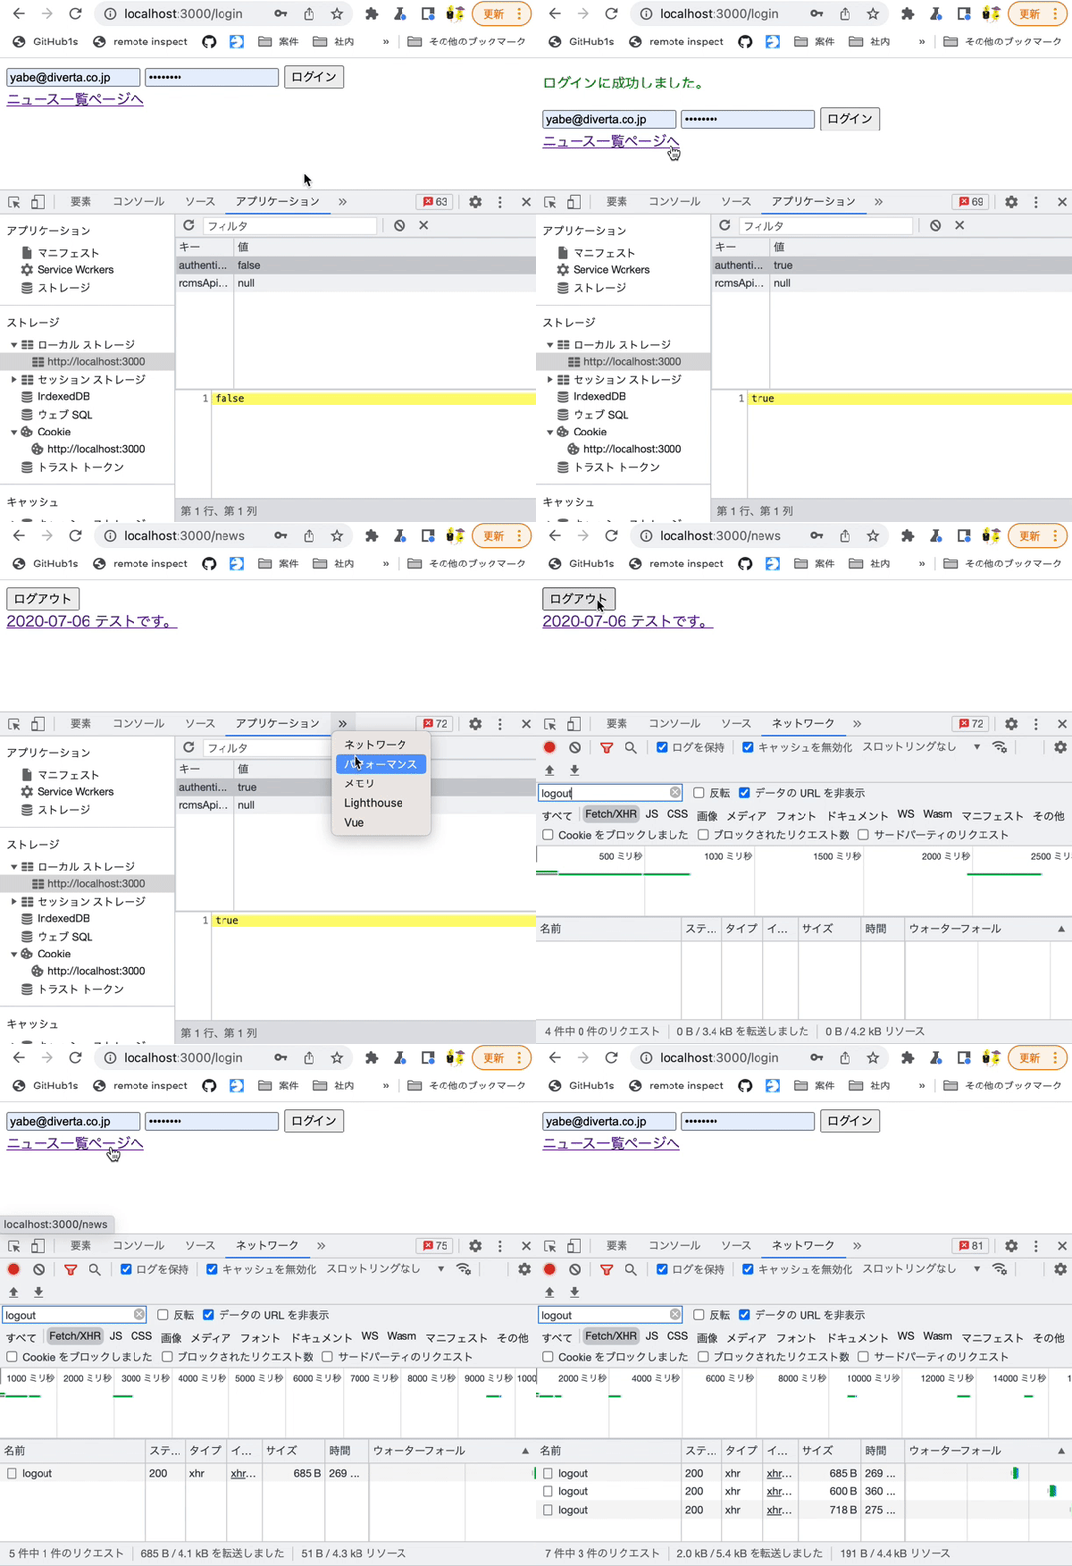
ログイン状態のニュース一覧画面にてログアウトボタンをクリックすると、下記となることを確認します。
- logoutエンドポイントへリクエストしている
- ログイン画面に遷移する
- そのままログインせずにニュース一覧画面へアクセスすると、ログイン画面に自動遷移される
 以上でAPIセキュリティがcookieの場合のログイン処理の実装が完了です。
B. ログイン処理実装(APIセキュリティが動的アクセストークンの場合)
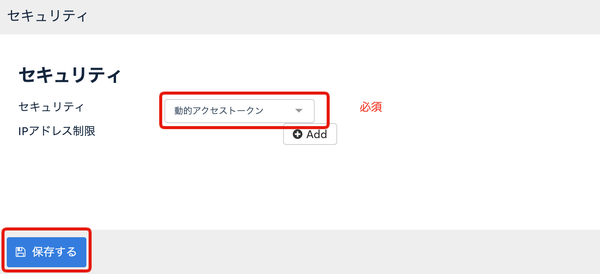
次に、先ほどダミーで作成していたログイン処理をloginエンドポイントへとアクセスするように変更します。 ここではAPIセキュリティが動的アクセストークンの場合の実装方法を説明します。 Kuroco管理画面より、[API] -> [login] をクリックし、「セキュリティ」をクリックしてください。
「セキュリティ」より動的アクセストークンを選択し、「保存する」をクリックしてください。
login,tokenエンドポイントへのリクエスト実装
stores/authentication.jsを下記に修正します。
...
     async login(payload) {
-      // dummy request(succeed/fail after 1 sec.)
-      const shouldSuccess = true;
-      const request = new Promise((resolve, reject) =>
-        setTimeout(
-          () => (shouldSuccess ? resolve() : reject(Error("login failure"))),
-          1000
-        )
-      );
-      await request;
+      const { grant_token } = await $fetch("/rcms-api/1/login", {
+          method: "POST",
+          baseURL: useRuntimeConfig().public.apiBase,
+          credentials: "include",
+          body: payload,
+      });
+      const { access_token } = await $fetch("/rcms-api/1/token", {
+          method: "POST",
+          baseURL: useRuntimeConfig().public.apiBase,
+          credentials: "include",
+          body: { grant_token: grant_token },
+      });

        this.setProfile({}) // Apply the dummy object to store.state.profile
        this.updateLocalStorage({ authenticated: true })
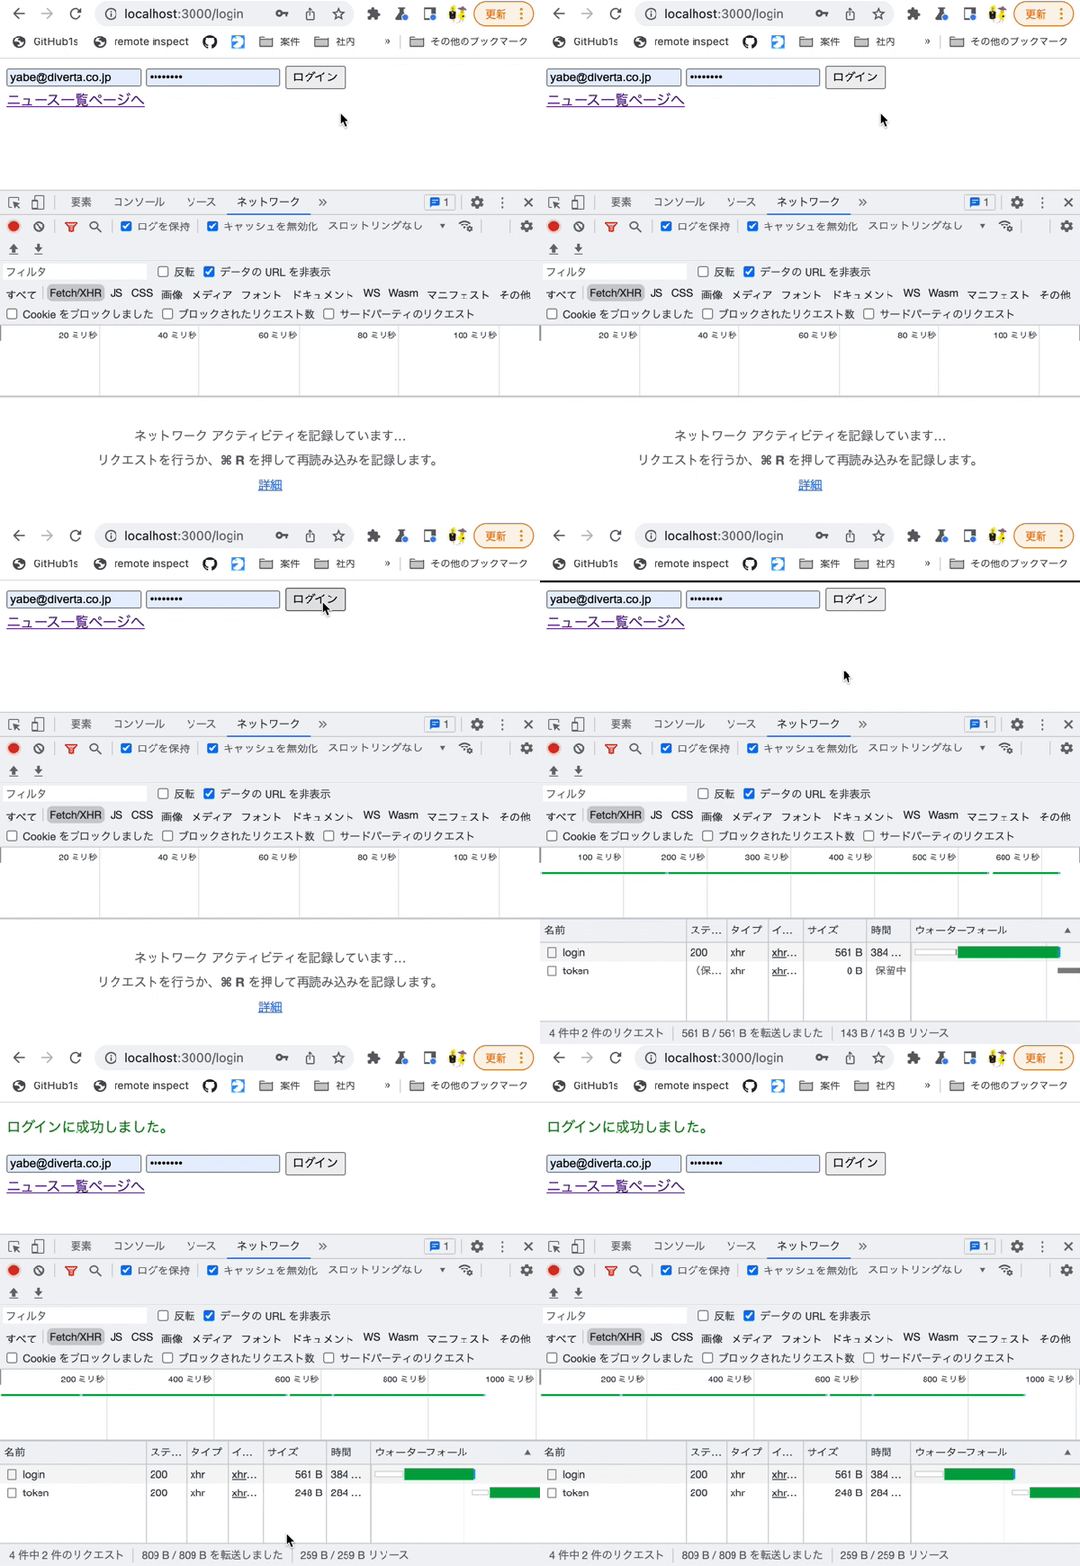
loginエンドポイントとtokenエンドポイントへリクエストされているか確認します。
ログインページを開き、Chromeの開発者ツール:ネットワークを開いた状態でログイン処理を行います。 すると、loginエンドポイントとtokenエンドポイントへとリクエストされていることが確認できます。
tokenの保持
ここまでは、ログインしているかどうかをLocalStorageのauthenticatedのフラグ値で判定していました。
しかし、動的アクセストークンでは認証を要求するエンドポイントには実際のtoken値が必要になります。
そのため、authenticatedをtokenへ変更し、token値を保持するようにします。
middleware/auth.jsを下記に修正します。
import { useStore } from '~/stores/authentication';

export default defineNuxtRouteMiddleware(async (to, from) => {
  const store = useStore();

  // Define public paths that don't require authentication (add any login pages that don't require authentication)
  const publicPaths = ['/login'];

  // Allow access if the current path is public
  if (publicPaths.some(path => to.path.startsWith(path))) {
    return;
  }

-  if (!store.authenticated) {
+  if (!store.access_token) {
    try {
      await store.restoreLoginState();
    } catch (err) {
      return navigateTo('/login');
    }
  }
});
次に、このロジックを stores/authentication.js でも使用するように調整します。
import { defineStore } from "pinia";

export const useStore = defineStore("authentication", {
  state: () => ({
    profile: null,
+    access_token: "",
  }),
   actions: {
    ...
+    updateLocalStorage(payload) {
+      Object.entries(payload).forEach(([key, val]) => {
+        if (val === null || val === false) {
+          localStorage.removeItem(key);
+        } else {
+          localStorage.setItem(key, JSON.stringify(val));
+        }
+      });
+    },
     async login (payload) {
        const { grant_token } = await $fetch("/rcms-api/1/login", {
        method: "POST",
        baseURL: useRuntimeConfig().public.apiBase,
        credentials: "include",
        body: payload,
      });
      const { access_token } = await $fetch("/rcms-api/1/token", {
        method: "POST",
        baseURL: useRuntimeConfig().public.apiBase,
        credentials: "include",
        body: { grant_token: grant_token },
      });

+        this.updateLocalStorage({ rcmsApiAccessToken: access_token.value })
+        this.access_token = access_token.value
+
         this.setProfile({}) // Apply the dummy object to store.state.profile
-        this.updateLocalStorage({ authenticated: true })
     },
     async restoreLoginState () {
-        const authenticated = JSON.parse(localStorage.getItem('authenticated'))
+        const rcmsApiAccessToken = JSON.parse(localStorage.getItem('rcmsApiAccessToken'))
-        if (!authenticated) {
+        if (!rcmsApiAccessToken) {
             throw new Error('need to login')
         }
         this.setProfile({}) // store dummy object.
     }
 }
ログイン成功後の動きを確認します。
ログインページを開き、Chromeの開発者ツール:アプリケーションを開いた状態でログイン処理を行います。 すると、rcmsApiAccessTokenに値が保存されます。
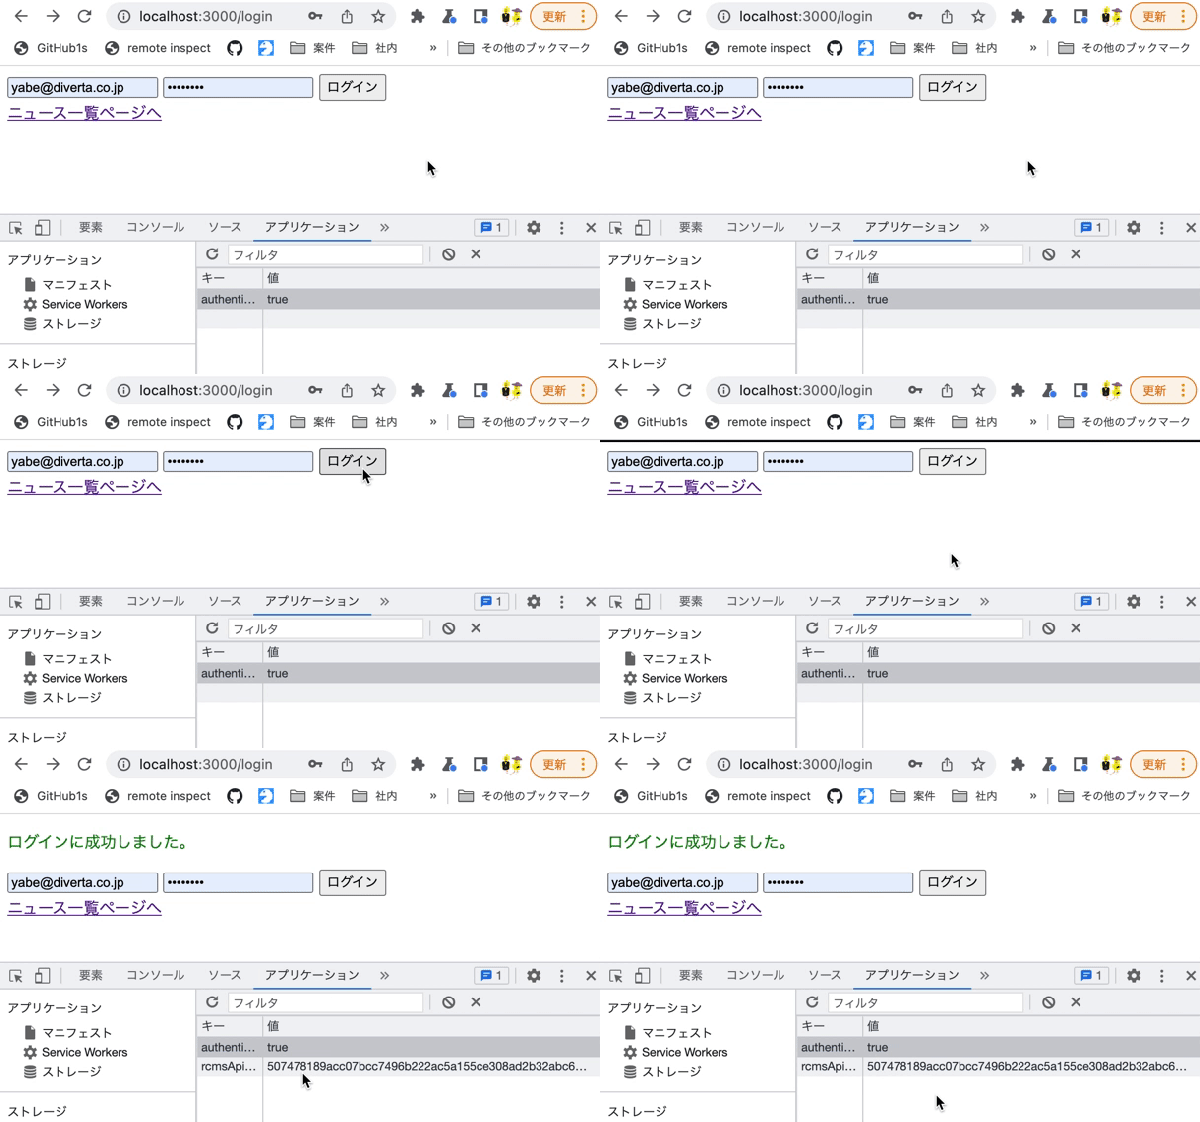
profileエンドポイントへのリクエスト/ハンドリング実装
今までの実装では、ブラウザのLocalStorageのrcmsApiAccessTokenフラグによってログイン済かどうかを判断する実装をしています。
しかしながら、LocalStorageはブラウザ上で簡単に改ざんが可能です。
またセッション有効期限によってrcmsApiAccessTokenがtrueであっても、実際には他のエンドポイントへのリクエストがアクセスエラーとなる場合もあります。
これらによる誤動作を防ぐため、APIへアクセスすることによって、もう1クッションの追加確認をします。
そのため、stores/authentication.jsを下記のように修正します。
export const useStore = defineStore('authentication', {
  state: () => ({
    profile: null,
    access_token: "",
  }),
  actions: {
    setProfile(profile) {
      this.profile = profile;
    },
    updateLocalStorage(payload) {
      Object.entries(payload).forEach(([key, val]) => {
        if (val === null || val === false) {
          localStorage.removeItem(key);
        } else {
          localStorage.setItem(key, JSON.stringify(val));
        }
      });
    },
    async login(payload) {
      const { grant_token } = await $fetch("/rcms-api/1/login", {
          method: "POST",
          baseURL: useRuntimeConfig().public.apiBase,
          credentials: "include",
          body: payload,
      });
      const { access_token } = await $fetch("/rcms-api/1/token", {
          method: "POST",
          baseURL: useRuntimeConfig().public.apiBase,
          credentials: "include",
          body: { grant_token: grant_token },
      });

      this.updateLocalStorage({ rcmsApiAccessToken: access_token.value })
      this.access_token = access_token.value

-      this.setProfile({}) // Apply the dummy object to store.state.profile
+      const { authFetch } = useAuthFetch(this.access_token);
+      const profileRes = await authFetch("/rcms-api/1/profile", {
+        baseURL: useRuntimeConfig().public.apiBase,
+      });
+      this.setProfile(profileRes);
    },
    async restoreLoginState() {
      const rcmsApiAccessToken = JSON.parse(localStorage.getItem('rcmsApiAccessToken'))

      if (!rcmsApiAccessToken) {
        throw new Error("need to login");
      }
+      this.access_token = rcmsApiAccessToken;
      try {
-      this.setProfile({}) // Apply the dummy object to store.state.profile
+        const { authFetch } = useAuthFetch(this.access_token);
+        const profileRes = await authFetch("/rcms-api/1/profile", {
+          baseURL: useRuntimeConfig().public.apiBase,
+        });
+        this.setProfile(profileRes);
      } catch {
        throw new Error("need to login");
      }
     }
  },
  getters: {
    authenticated: (state) => state.profile !== null,
    token: (state) => state.access_token,
  },
});
また、アプリケーション全体で、エンドポイントに動的アクセストークンを付与する仕組みをコンポーザブル(composables)を使って実現します。
以下の composables/authFetch.js ファイルを作成してください:
export const useAuthFetch = (accessToken = null) => {
  // If no token provided, try to get it from store
  let token = accessToken;
  if (!token) {
    const store = useStore();
    token = store.access_token;
  }

  const authFetch = (url, config = {}) => {
    return $fetch(url, {
      ...config,
      headers: {
        ...(config.headers || {}),
        "X-RCMS-API-ACCESS-TOKEN": token,
      },
    });
  };

  return { authFetch };
};
ログイン後、ブラウザの画面更新をしてニュース一覧画面に遷移し、ログイン状態がリストアされることを確認します。
ログインページを開き、Chromeの開発者ツール:アプリケーションを開いた状態でログイン処理を行います。 すると、rcmsApiAccessTokenに値が保存されます。
また、この状態で、「ニュース一覧ページへ」をクリックし画面遷移しても、rcmsApiAccessTokenに値が保存されたままであることを確認できます。
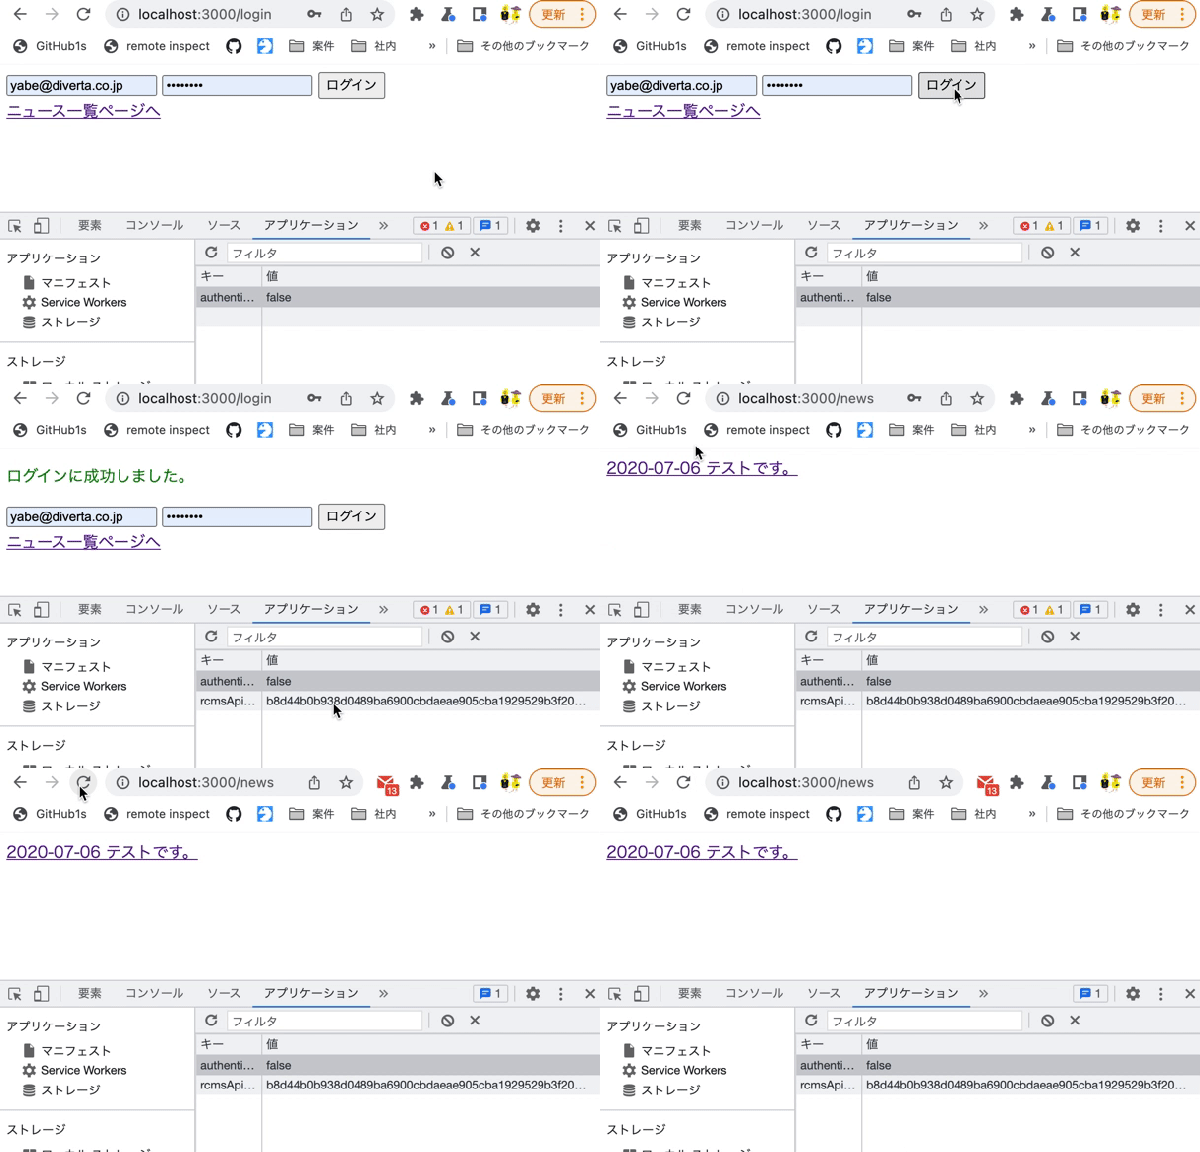 さらに、LocalStorageの
rcmsApiAccessTokenをChromeの開発者ツールより修正した場合、リストア時にログイン画面へ強制的に画面遷移されることが確認できます。
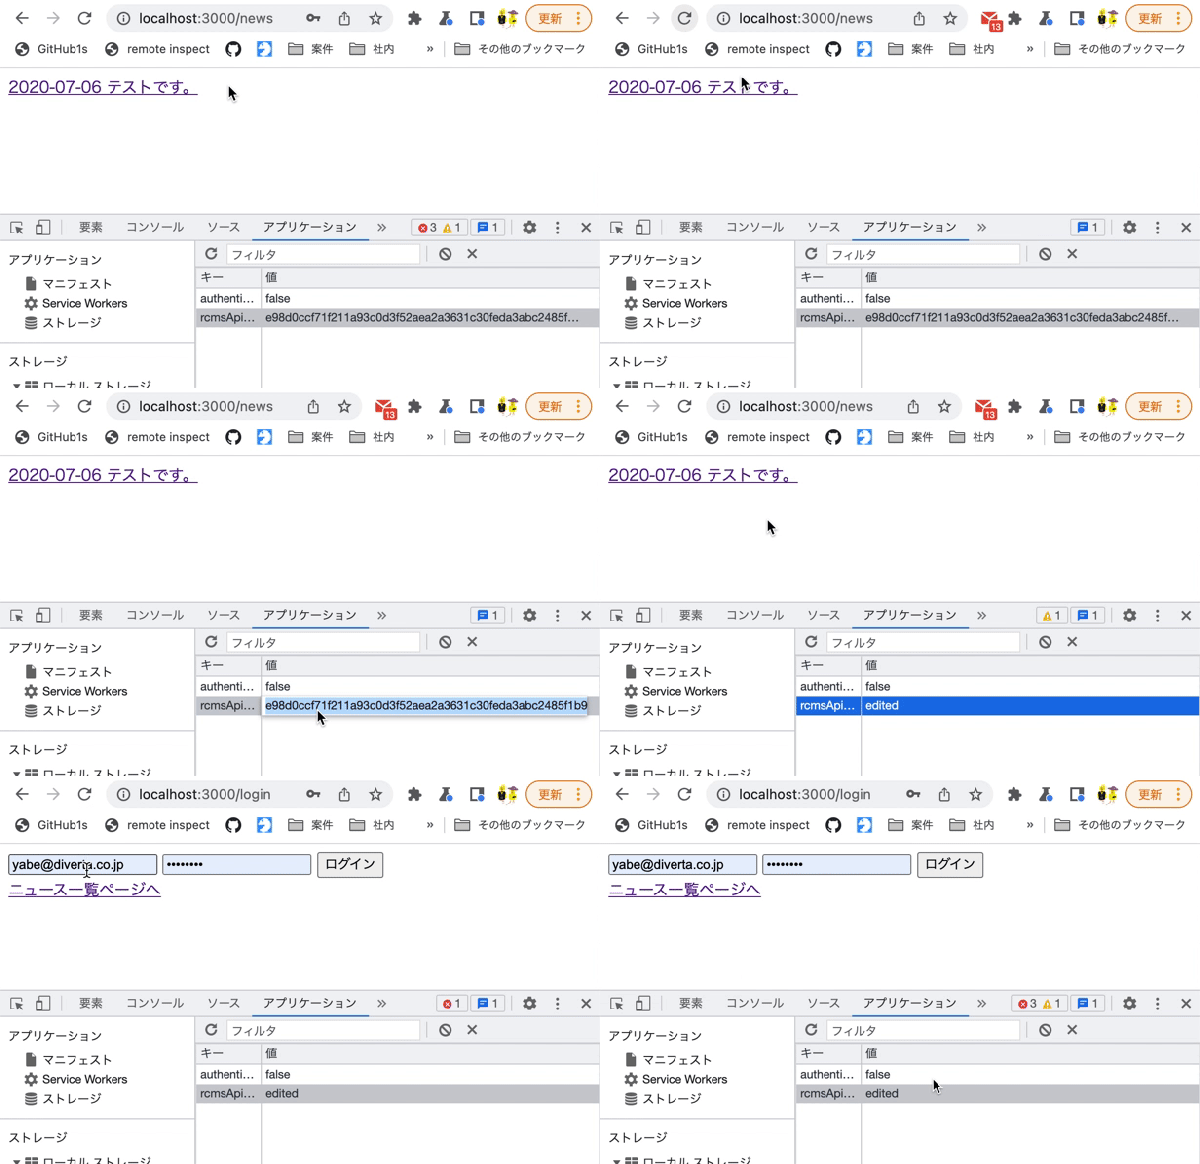
logoutエンドポイントへのリクエスト/ハンドリング実装
次に、ログアウト処理を実装します。
Kuroco側でセッションが残っていながらフロント側で再ログインした場合など、予期せぬ動作が発生する可能性もあります。
そのため、ログイン状態ではないと判定する場合はAPIへログアウト状態にするようリクエストする必要があります。
/stores/authentication.jsを下記のように修正します。
...
-   async restoreLoginState() {
+    async logout() {
+      try {
+        const { authFetch } = useAuthFetch();
+        await authFetch("/rcms-api/1/logout", {
+          method: "POST",
+          baseURL: useRuntimeConfig().public.apiBase,
+          credentials: "include",
+        });
+      } catch {
+        /** No Process */
+        /** When it returns errors, it consider that logout is complete and ignore this process. */
+      }
+      this.setProfile(null);
+      this.access_token = "";
+      this.updateLocalStorage({ rcmsApiAccessToken: null });
+
+      navigateTo("/login");
+    },
+   async restoreLoginState() {
      const rcmsApiAccessToken = JSON.parse(localStorage.getItem('rcmsApiAccessToken'))

      if (!rcmsApiAccessToken) {
        await this.logout();
        throw new Error("need to login");
      }
      this.access_token = rcmsApiAccessToken;

      try {
        const { authFetch } = useAuthFetch(this.access_token);
        const profileRes = await authFetch("/rcms-api/1/profile", {
          baseURL: useRuntimeConfig().public.apiBase,
        });
        this.setProfile(profileRes);
      } catch {
+        await this.logout();
        throw new Error("need to login");
      }
    },
  },
また、ニュース一覧画面を以下のように修正し、ログアウトボタンを作成します。
diff --git pages/news/index.vue pages/news/index.vue
index dcdd806..e79e075 100644
--- pages/news/index.vue
+++ pages/news/index.vue
@@ -1,23 +1,31 @@
 <template>
     <div>
+        <button type="button" @click="logout">
+            Logout
+        </button>
         <div v-for="n in response.list" :key="n.slug">
             <nuxt-link :to="'/news/'+ n.slug">
                 {{ n.ymd }} {{ n.subject }}
             </nuxt-link>
         </div>
     </div>
 </template>

 <script setup>
+import { useStore } from "~/stores/authentication";
const config = useRuntimeConfig();
definePageMeta({
  middleware: ["auth"], // Use the 'auth' middleware defined in middleware/auth.ts
});

const { data: response } = await useFetch("/rcms-api/1/news", {
  baseURL: config.public.apiBase,
  credentials: "include",
});
+ const store = useStore();
+ const logout = () => store.logout();
 </script>
ログイン状態のニュース一覧画面にてログアウトボタンをクリックすると、下記となることを確認します。
- logoutエンドポイントへリクエストしている
- ログイン画面に遷移する
- そのままログインせずにニュース一覧画面へアクセスすると、ログイン画面に自動遷移される
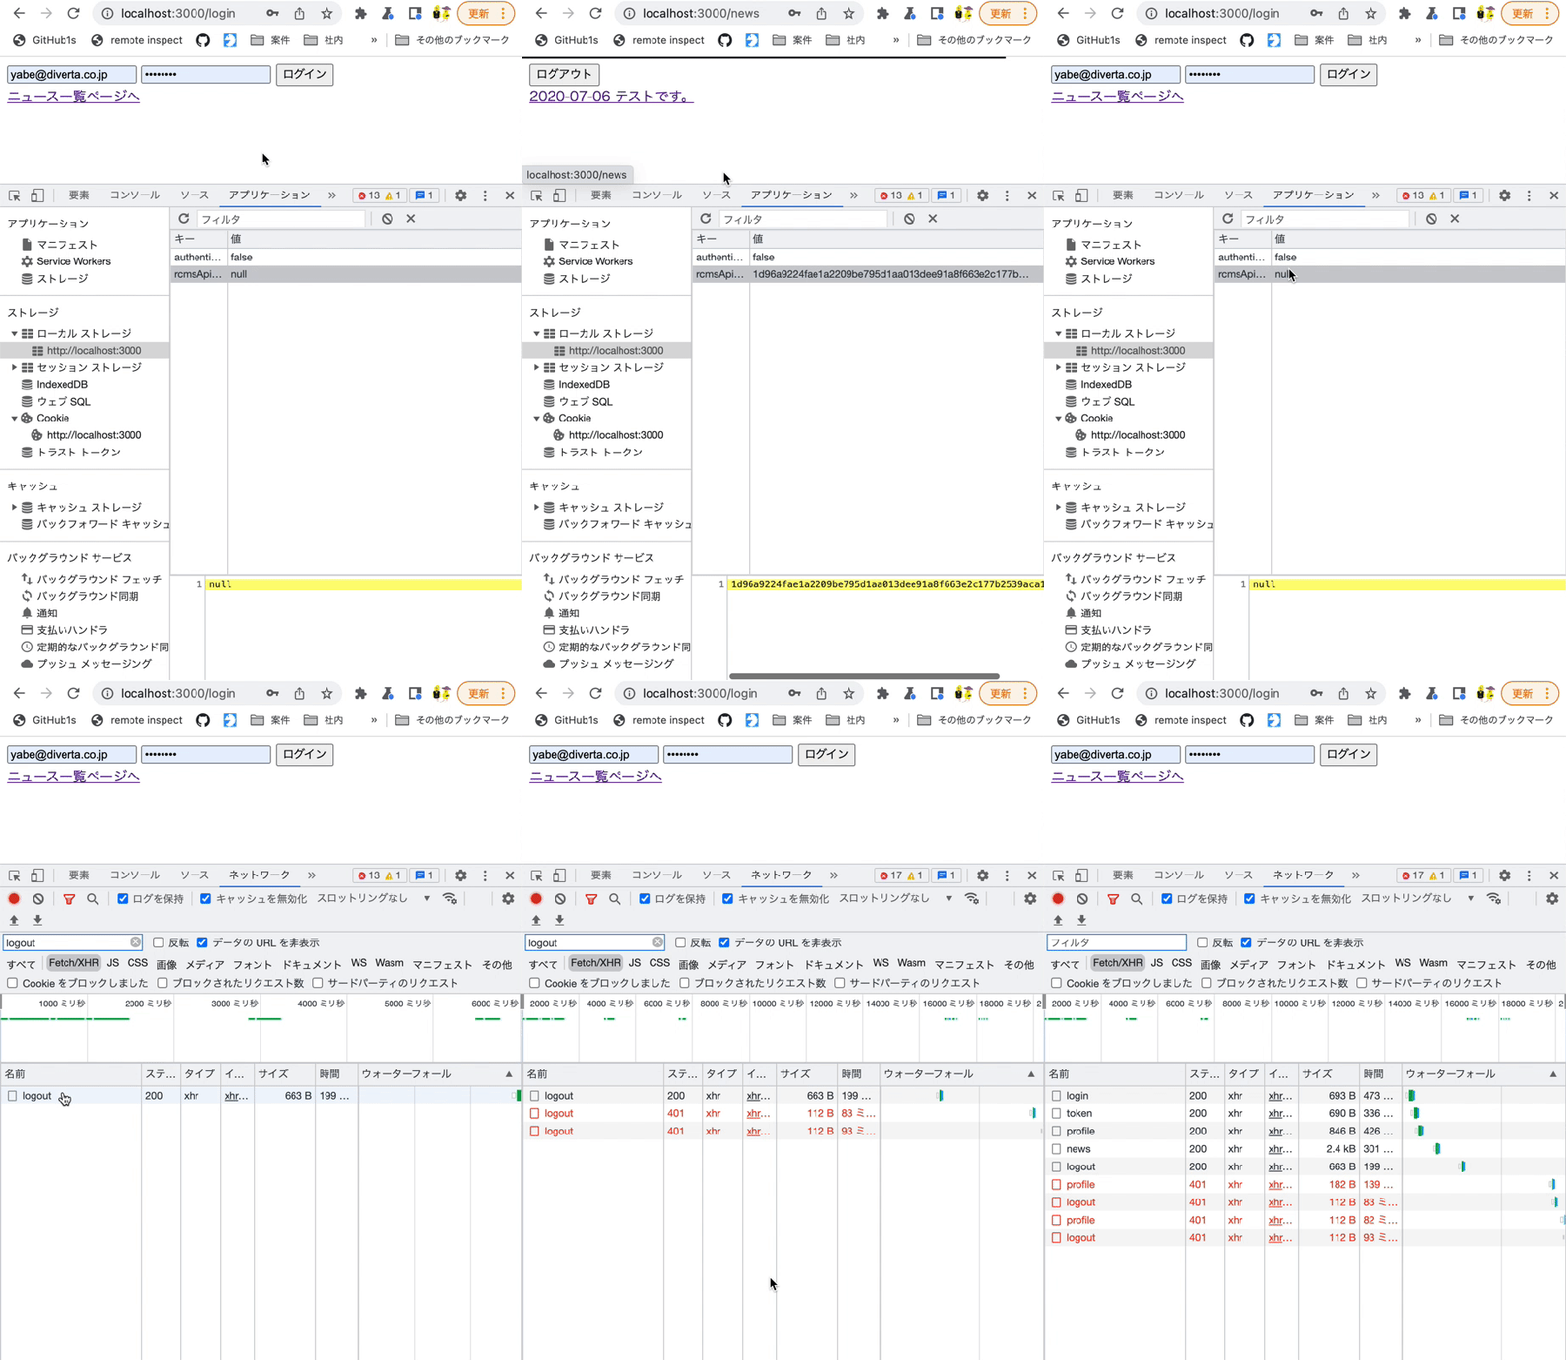 以上でAPIセキュリティが動的アクセストークンの場合のログイン処理の実装が完了です。
参考
以上でKurocoを利用したNuxt.jsプロジェクトで、ログイン画面の作成方法の紹介を終わります。
今回は基本的な説明のため、簡単にログイン画面を作成して最低限のログイン制御を実現しました。
実際に利用する際には、フォームのバリデーション処理や、@nuxt/auth などのライブラリをご利用いただく必要性が考えられますが、基本的なログイン構築の流れの理解としてご利用いただければ幸いです。
関連ドキュメント
サポート
お探しのページは見つかりましたか?解決しない場合は、問い合わせフォームからお問い合わせいただくか、Slackコミュニティにご参加ください。